Chapter 9: Kitchen-Table Inventions & Maker Projects
9.1 The Invention Studio: 3D Printing, Slicing & Pendulums
Picture the kitchen table on a rainy Saturday morning. In the center sits a spool of corn-based PLA plastic filament, a pair of digital calipers, a stopwatch, a piece of string, the 3D-printed math blocks you have used throughout this book, and your StackCalc SC-6 calculator. Outside, the rain taps against the window; inside, the table is a live invention workshop!
If you have ever stared at a page of math homework and wondered, "When am I ever going to use this in real life?"—this chapter is your answer! Math was never meant to stay trapped on flat paper under a red grading pen. It is the secret blueprint behind every moving machine, 3D print, and kitchen experiment.
Math is what guides a 3D printer nozzle heated to \(215^\circ\text{C}\) as it slices your Counting Tiles and Planetary Geared Clock into paper-thin \(0.20\text{ mm}\) layers. And it is the steady rhythm discovered by Galileo Galilei in 1638 (Galilei, 1638) that keeps a grandfather clock pendulum swinging back and forth in equal beats across centuries.
When you pick up the SC-6 at your workbench, you aren't just doing schoolwork—you are an engineer, a builder, and an inventor! In a real workshop, you know your math is right when your creation actually works: when the 3D-printed gears mesh smoothly, the printed layers stack to the exact millimeter, and the pendulum keeps steady time. With Stack Math, you push lengths and weights onto the stack, tap your keys, and watch your ideas turn into machines that whir, tick, and fly!
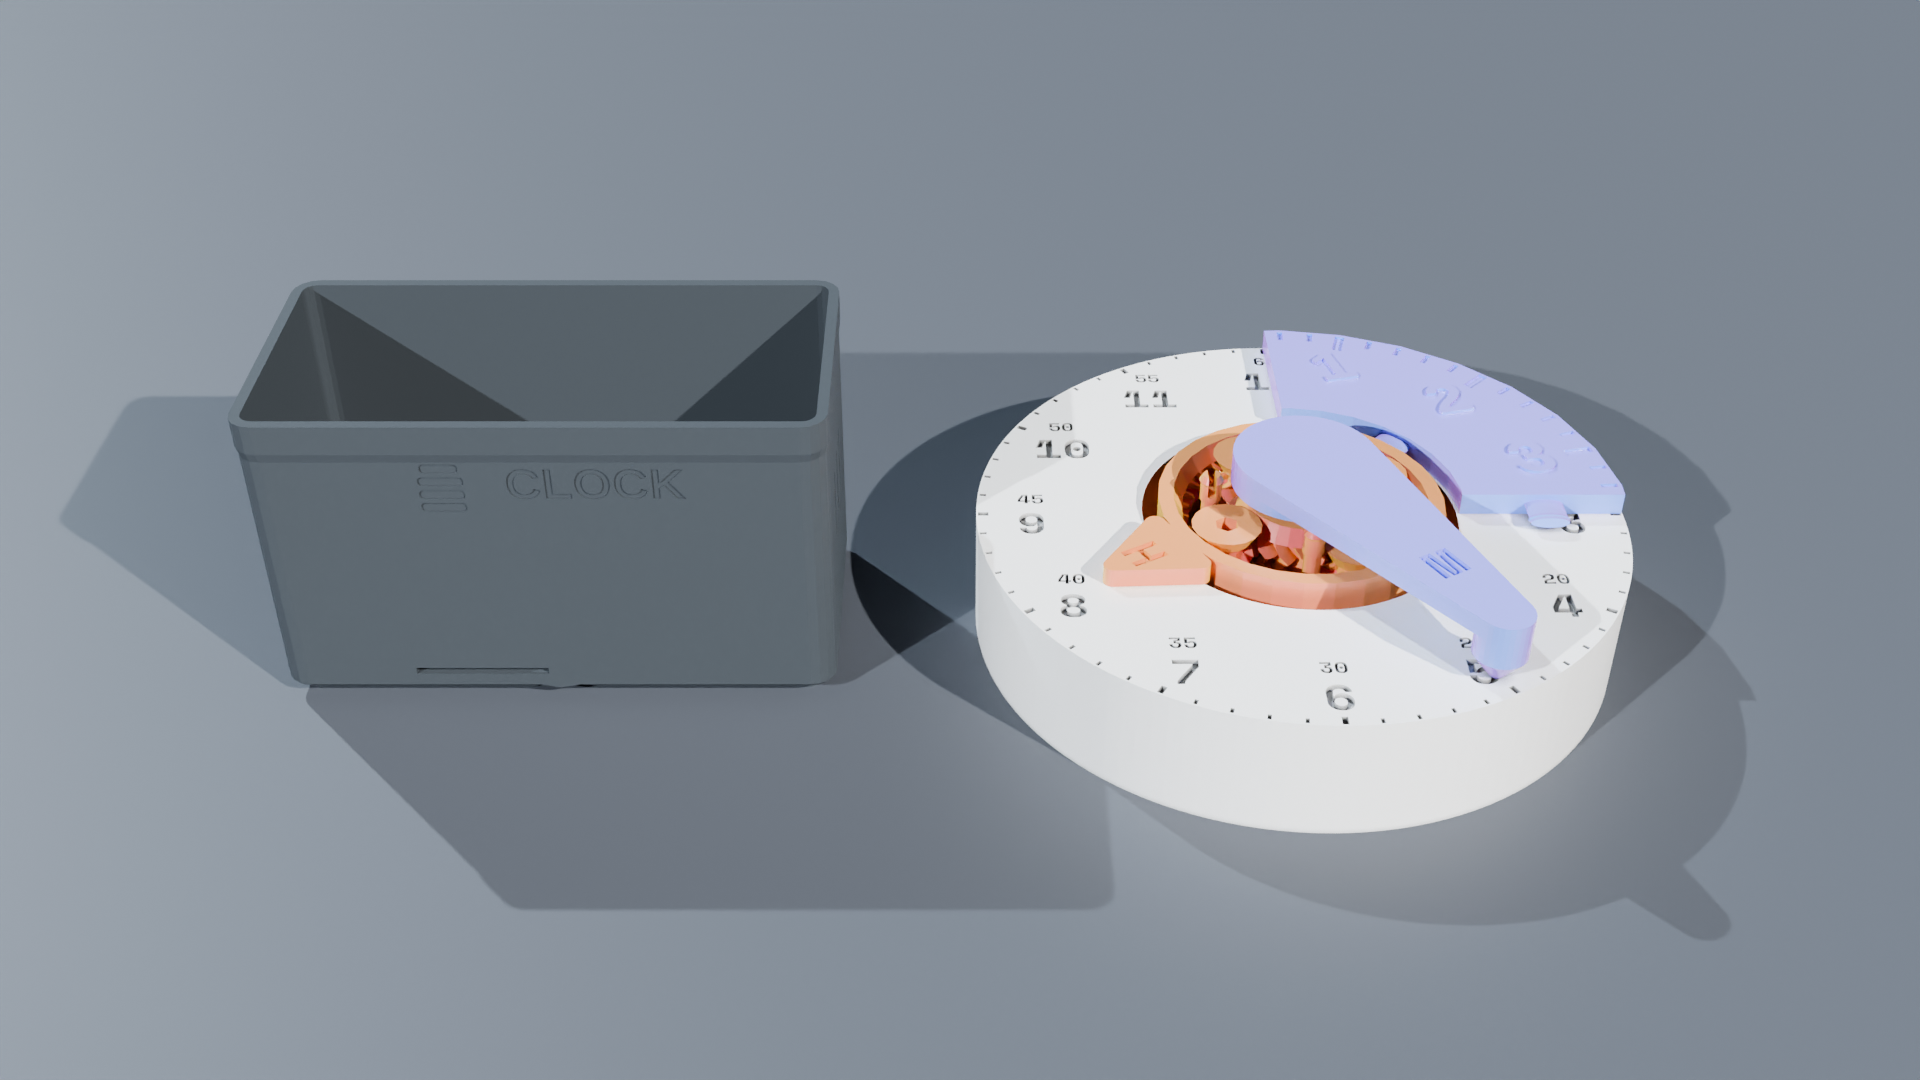
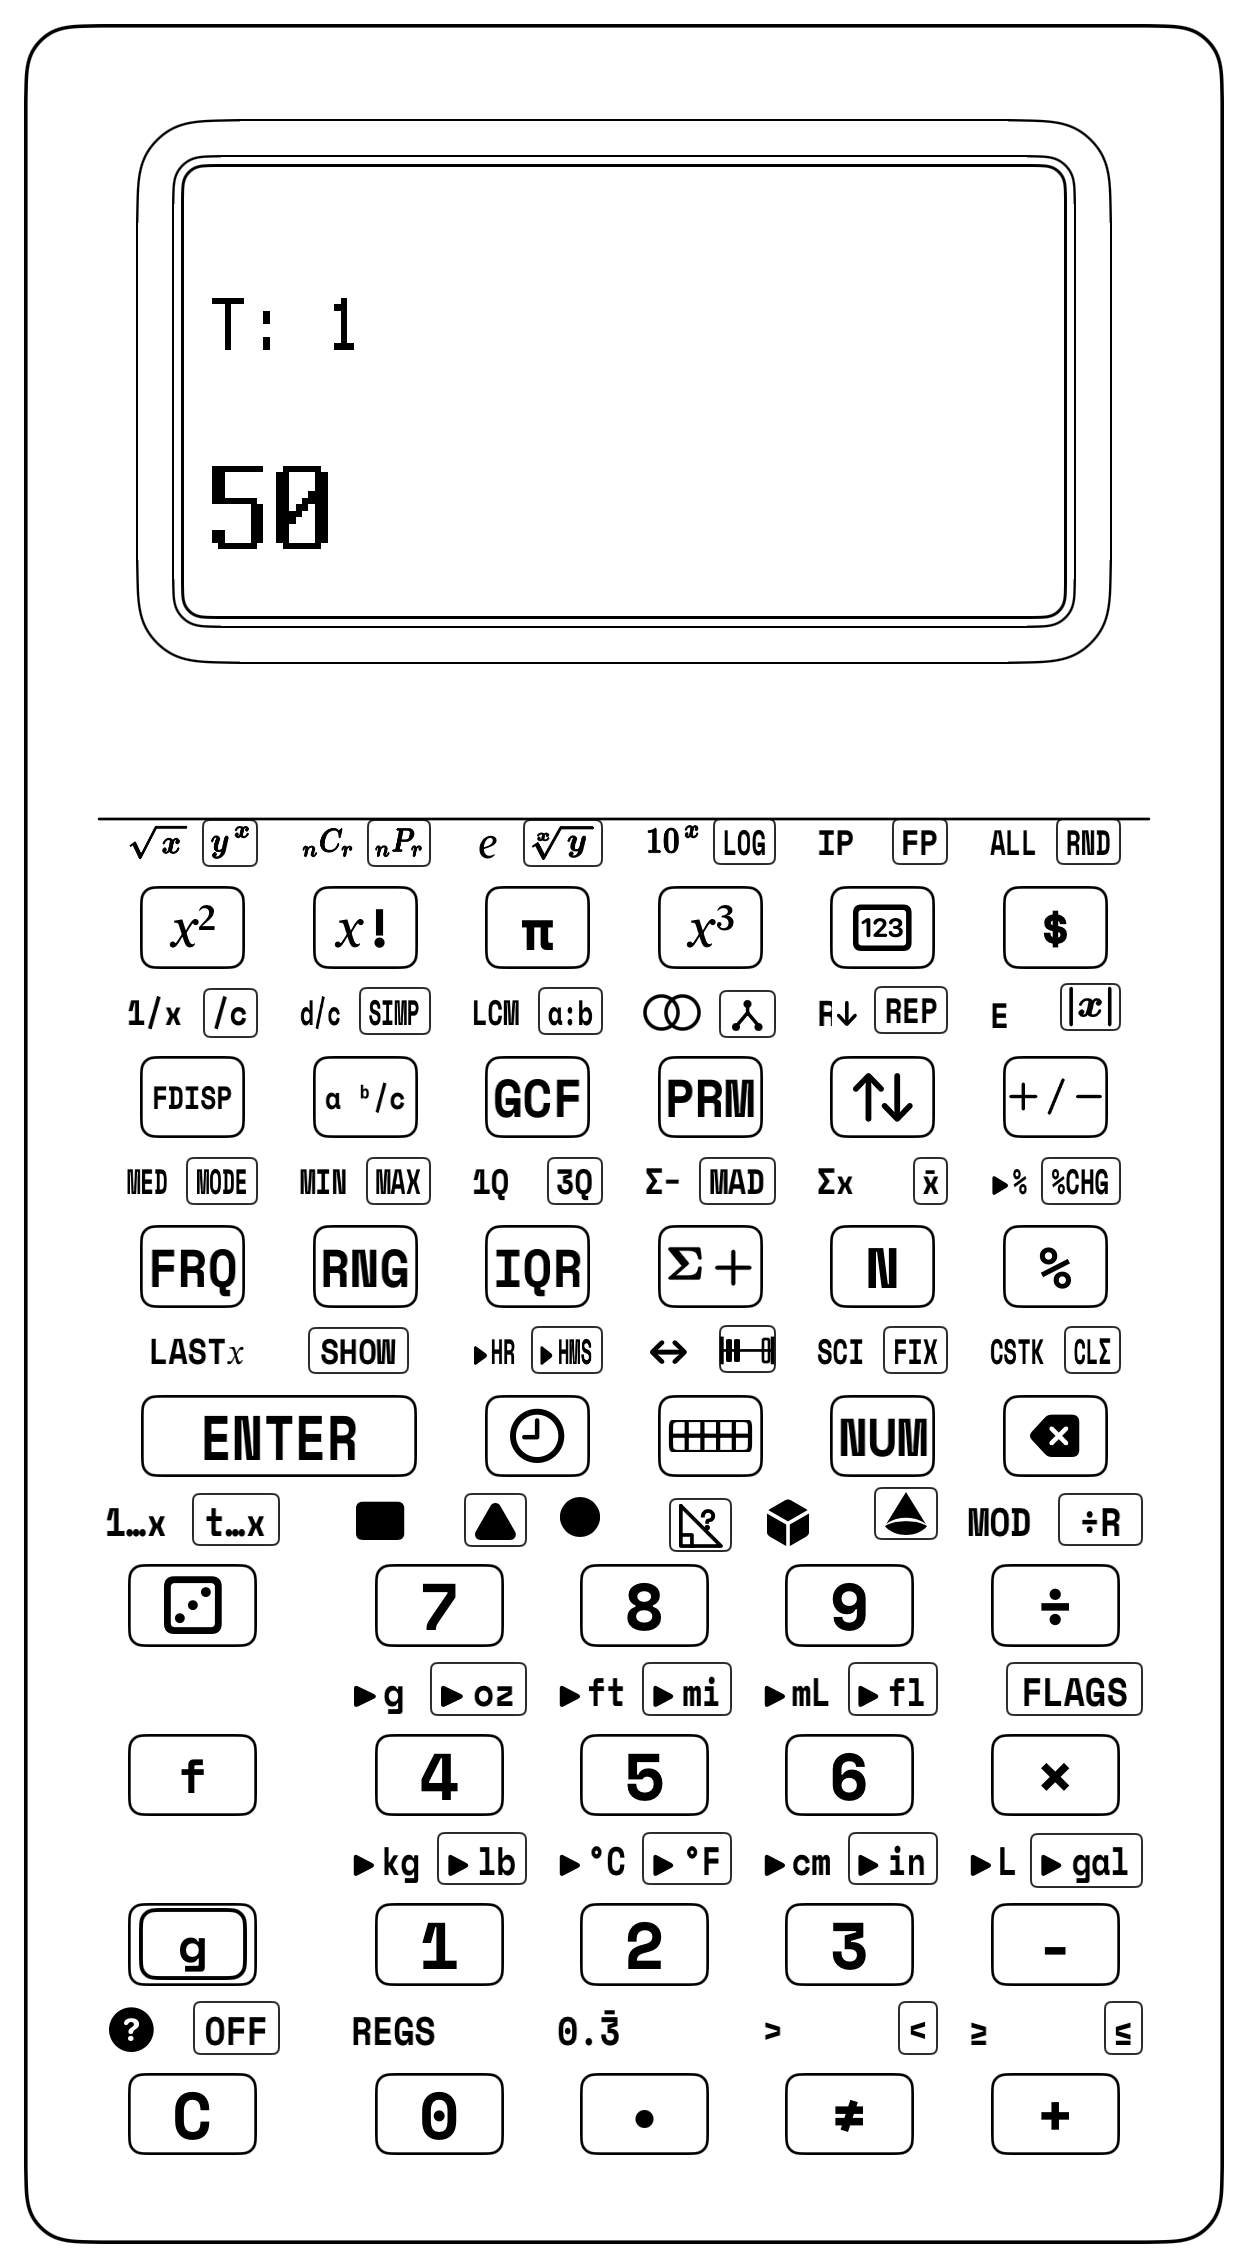
How 3D Printers Slice Models into Thin Layers: Look at the SC-6 screen above: a 3D-printed block stands \(3\text{ cm}\) tall in total, and its solid base takes up the bottom \(2\text{ cm}\). Subtracting 3 [ENTER] 2 [-] leaves \(1\text{ cm}\) of height for the top section. When the 3D printer slices that \(1\text{ cm}\) top section into horizontal plastic layers that are each \(0.02\text{ cm}\) (\(0.20\text{ mm}\)) thick, dividing by .02 [÷] shows that the printer nozzle must lay down 50 layers!
9.1.1 How the 12 Maker Projects Work
To turn your desk or kitchen table into an invention lab, gather four simple tools beside your 3D-printed math blocks and your SC-6: a metric ruler (or digital calipers), a digital kitchen scale, a stopwatch, and a notebook. Each project in this chapter pairs a hands-on physical build with a live calculation on the 4-level stack (\(X, Y, Z, T\)). In 3D Printing & Workshop Geometry, you will measure filament strands and layer heights with calipers, spin the gears of your Planetary Geared Clock ([🕒]), and find circular cross-sections ([x²], [π]) and [f] [LASTX] height checks right at the printer bed.
In Physics Timers, Catapults & Solar Angles, you will time swinging pendulums with a stopwatch, dial launch and solar tilt angles on your Unit Circle Volvelle, and drop multi-trial experiments into the [Σ+] basket to find your bullseye average ([g] [x̄]) and consistency ([g] [MAD]). And in Kitchen Scaling & Maker Budgets, you will stack Fraction Towers ([a ᵇ/c]) beside your measuring cups and kitchen scale to resize recipes, track growth rates, and price out filament spools and club gear ([%], [g] [%CHG], [$]).
9.1.2 How Much Plastic & Money Does a 3D Print Use?
Have you ever wondered how a 3D printer's slicing software knows—down to the gram and the penny—how much plastic your design will use before the nozzle even heats up? Peek inside the extruder head of a desktop 3D printer: a tiny steel hobbed drive gear with microscopic teeth grips the plastic filament from the spool and pushes it millimeter by millimeter into the \(215^\circ\text{C}\) melting chamber. Because the printer's stepper motor counts every fraction of a turn of that drive gear, it knows the exact length of filament unspooled!
Unwind a few centimeters of plastic filament and look closely at it. That flexible strand is really a long, thin cylinder—like a giant strand of plastic spaghetti. Standard 3D printing filament has a width (diameter) of \(1.75\text{ mm}\), which means its radius from the center to the edge is half of that: \(0.875\text{ mm}\), or \(0.0875\text{ cm}\). Once you multiply the tiny circular cross-section of its cut end (\(\pi \times \text{Radius}^2\)) by the length of strand pulled off the reel, you have the exact cubic centimeters of plastic—which converts straight into grams (\(1.24\text{ g/cm}^3\) for corn-based PLA) and cents from a \(1,000\text{-gram}\) spool: $\(\text{Filament Volume} = (\pi \times \text{Radius}^2) \times \text{Length}, \qquad \text{Part Weight} = \text{Volume} \times 1.24\text{ g/cm}^3\)$
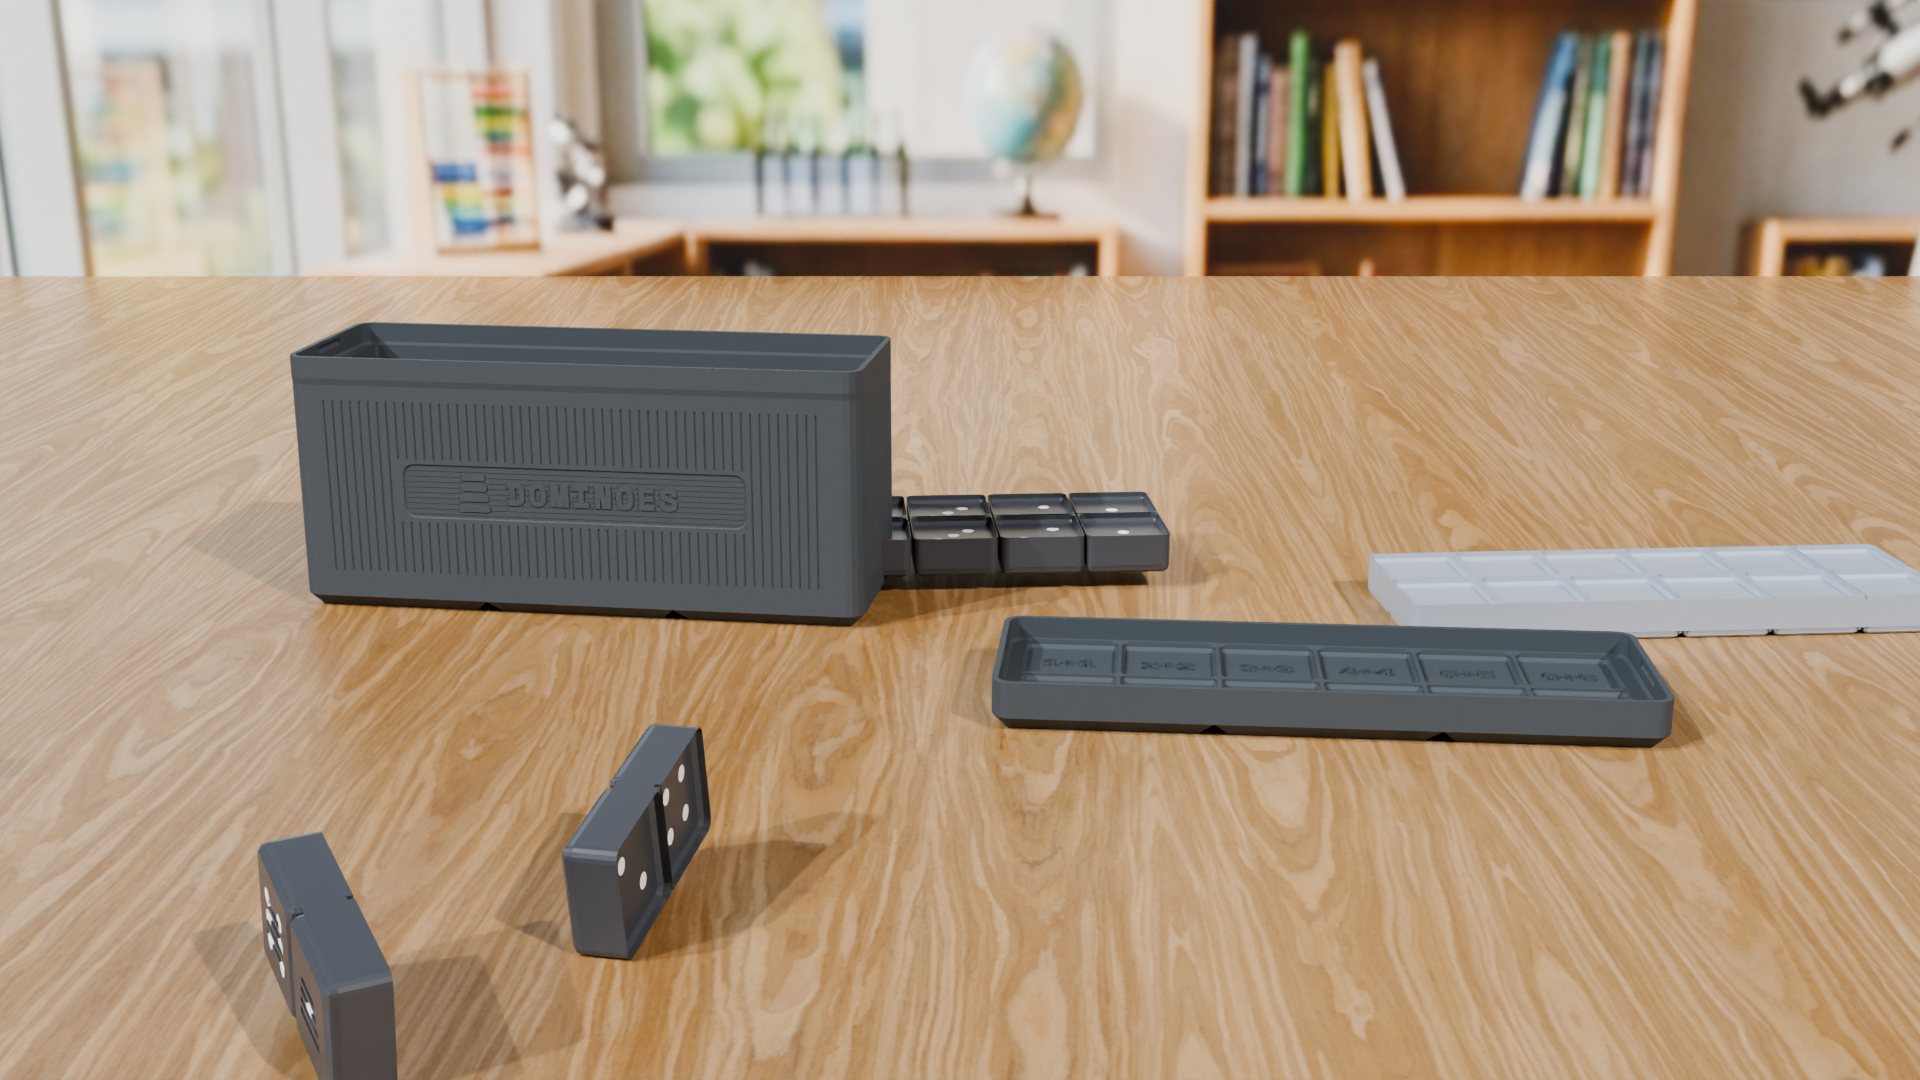
From Filament Strand to Price Tag:
When your 3D-printer slicer reports that a replacement divider tray for your Math Dominoes takes \(500\text{ cm}\) (\(5.0\text{ meters}\)) of filament from a \(\$20.00\) spool (\(1,000\text{ g}\), or \(\$0.02/\text{g}\)), you can price it in seconds: squaring the \(0.0875\text{ cm}\) radius (.0875 [x²] [π] [×] \(\to 0.02405\text{ cm}^2\)) and multiplying by 500 [×] gives \(12.03\text{ cm}^3\) of PLA, or 1.24 [×] \(= \mathbf{14.91\text{ grams}}\). Keying 20 [ENTER] 1000 [÷], [×], and [$] rounds \(14.91 \times \$0.02\) to $0.30—and weighing a nearly empty spool on your kitchen scale (minus \(200\text{ g}\) for the empty reel) tells you right away whether you have \(15\text{ grams}\) left for an overnight print!
Watch the full shelf-by-shelf sequence when you print a deeper storage bin for all your Counting Tiles, using \(1,200\text{ cm}\) (\(12\text{ meters}\)) of \(1.75\text{ mm}\) filament (radius \(= 0.0875\text{ cm}\)). Finding the filament's circle area (\(\pi \times \text{Radius}^2\)) with .0875 [x²] [π] [×] gives 0.02405 cm², and multiplying by the \(1,200\text{ cm}\) length with .02405 [ENTER] 1200 [×] lands on 28.86 cm³:
| Keystroke | Register T | Register Z | Register Y | Register X | What Happens on the Stack |
|---|---|---|---|---|---|
.0875 |
0 | 0 | 0 | \(0.0875\) | Enter filament radius in centimeters (\(0.0875\text{ cm}\)) |
[x²] |
0 | 0 | 0 | \(0.007656\) | Square the radius (\(0.0875 \times 0.0875 = 0.00765625\text{ cm}^2\)) |
[π] |
0 | 0 | \(0.007656\) | \(3.141593\) | Enter \(\pi\); stack lifts the squared radius onto Shelf \(Y\) |
[×] |
0 | 0 | 0 | \(0.024053\) | Multiply to find the filament circle area (\(\approx 0.02405\text{ cm}^2\)) |
1200 |
0 | 0 | \(0.024053\) | 1200 | Enter the filament length (\(1,200\text{ cm}\)) |
[×] |
0 | 0 | 0 | \(28.863383\) | Multiply circle area by length to find plastic volume (\(28.86\text{ cm}^3\)) |
Shelf \(X\) shows that the storage bin uses \(\mathbf{28.86\text{ cm}^3}\) of melted plastic—turning a long, flexible strand of filament on the spool into a sturdy box on the printer bed that takes up about the same space as twenty-nine \(1\text{ cm}\) unit cubes.
Why 3D Prints Have a Honeycomb Inside (\(15\%\) Infill): Why don't 3D printers make every block \(100\%\) solid plastic inside? Just like honeybees build lightweight hexagonal combs inside a hive, a 3D printer builds strong outer walls and fills the inside with a \(15\%\) honeycomb grid.
You can feel this difference right in your hand by comparing a \(20\text{ mm}\) (\(2.0\text{ cm}\)) calibration test cube against a hollow-infill block. Closing your digital calipers across all three directions of the test cube shows that its length, width, and height are each an exact \(2\text{ cm}\). Multiplying the length, width, and height ([2] [ENTER] [2] [×] [2] [×]) finds the cube's volume in cubic centimeters, 8.0 cm³:
| Keystroke | Register T | Register Z | Register Y | Register X | What Happens on the Stack |
|---|---|---|---|---|---|
2 |
0 | 0 | 0 | 2 | Enter cube length in centimeters (\(2\text{ cm}\)) |
[ENTER] |
0 | 0 | 2 | 2 | Copy length onto Shelf \(Y\) |
2 |
0 | 0 | 2 | 2 | Enter cube width (\(2\text{ cm}\)) |
[×] |
0 | 0 | 0 | 4 | Multiply length by width to get the bottom square area (\(4\text{ cm}^2\)) |
2 |
0 | 0 | 4 | 2 | Enter cube height (\(2\text{ cm}\)); lifts area onto Shelf \(Y\) |
[×] |
0 | 0 | 0 | 8 | Multiply base area by height to find cube volume (\(8.0\text{ cm}^3\)) |
The bottom line shows a volume of \(\mathbf{8.0\text{ cm}^3}\)—the exact space of eight \(1\text{ cm}\) unit cubes stacked in a \(2 \times 2 \times 2\) block. Because every cubic centimeter (\(1\text{ cm}^3\)) of corn-based PLA plastic weighs \(1.24\text{ grams}\), printing that \(8.0\text{ cm}^3\) block completely solid (\(100\%\) infill) via [8] [ENTER] 1.24 [×] would weigh 9.92 grams (\(9.92\text{ grams}\)).
Now subtract the \(3.1\text{-gram}\) weight of a hollow-infill Counting Tile (9.92 [ENTER] 3.1 [-]) to get 6.82 g saved. That honeycomb inside saves \(\mathbf{6.82\text{ grams}}\) on every single block—and on a larger \(100\text{ cm}^3\) trophy base (\(20\text{ cm}^3\) solid outer shell plus \(80\text{ cm}^3\) at \(15\%\) infill), a \(15\%\) honeycomb cuts the weight from \(124.0\text{ g}\) down to \(39.68\text{ g}\), saving \(84.32\text{ grams}\) (\(\$1.69\) of filament) and more than two hours of print time while keeping the vertical hexagonal pillars strong enough to stand on!
9.1.3 Running a Desktop 3D-Printing Toy Factory
What does it take to run your own miniature toy factory at home or in a classroom maker lab? When you print a complete 24-piece set of Counting Tiles, you aren't just using plastic from the spool—you are also paying for the electricity that keeps the printer's nozzle and build plate warm for hours! Every block is built from the bottom up as the brass nozzle lays down paper-thin horizontal ribbons of melted PLA plastic (\(0.20\text{ mm}\) thick—so a \(14.4\text{ mm}\) tall two-tier block stack takes 14.4 [ENTER] 0.20 [÷] \(= \mathbf{72\text{ horizontal layers}}\)). In this project, you budget both the filament and the electricity for a full student kit.
Printing a Complete Set of 24 Counting Tiles: How much does the plastic cost to 3D print a complete student kit of 24 Counting Tiles—six tiles each of Coral Red, Amber Gold, Sky Cyan, and Indigo Purple arranged in a neat \(4 \times 6\) array on the heated build plate?
When you pop one finished \(19\text{ mm} \times 19\text{ mm}\) snap-together tile off the build plate and set it on a digital kitchen scale, the readout settles at \(3.1\text{ grams}\) of PLA plastic. In your head, you can already estimate the whole tray: 24 tiles times \(3\text{ grams}\) is \(72\text{ grams}\), plus 24 tenths of a gram (\(2.4\text{ g}\)) makes \(74.4\text{ grams}\). On your SC-6 stack, staging the 24-tile batch size on Shelf \(Y\) and multiplying by the \(3.1\text{-gram}\) single-tile weight via 24 [ENTER] 3.1 [×] places the exact kit weight of \(\mathbf{74.4\text{ grams}}\) on Shelf \(X\). Multiplying that batch weight by .02 [×] (\(2\text{ cents}\) per gram from a \(\$20.00\) kilogram spool) gives a raw plastic cost of \(\$1.488\), which one tap of [$] rounds cleanly to $1.49.
What if your school maker lab needs to print 10 complete student kits (240 Counting Tiles in total) so every table group has its own tray? Multiplying \(74.4\text{ grams}\) per kit by \(10\) kits uses \(744\text{ grams}\) of plastic, and subtracting \(1,000 - 744 = 256\text{ grams}\) shows that a single \(1,000\text{-gram}\) spool of PLA can produce all 10 classroom kits with \(256\text{ grams}\) of filament still left on the reel. Even better, dividing that \(256\text{-gram}\) reserve by \(3.1\text{ grams per tile}\) (256 [ENTER] 3.1 [÷]) proves that the leftover plastic on the reel can print 82 extra replacement tiles whenever a tile rolls under a cabinet!
How Much Electricity Does a 4.5-Hour Print Use?
Now let's check the electric bill for that 24-tile print job! While the printer's stepper motors hum back and forth and the heater block holds the nozzle at \(215^\circ\text{C}\), a classroom 3D printer draws an average electrical power of \(120\text{ Watts}\)—which is \(0.120\text{ kilowatts}\) (\(\text{Watts} \div 1,000\)). Because the 24-tile Counting Tile kit takes \(4.5\text{ hours}\) to finish and your local utility charges \(\$0.15\) per kilowatt-hour (kWh), you can chain the entire utility check on the stack. First, enter [.] 12 [ENTER] 4.5 [×] to multiply \(0.120\text{ kW} \times 4.5\text{ hours} = \mathbf{0.54\text{ kWh}}\) (just over half a kilowatt-hour of energy). Next, multiply that \(0.54\text{ kWh}\) by the utility rate with [.] 15 [×] to get \(\$0.081\)—only \(8\text{ cents}\) of electricity for a four-and-a-half-hour print! Finally, add the filament cost right onto the electric cost with 1.49 [+] [$] ($1.49 + $0.081 = $1.571) to land on \(\$1.57\) for the entire 24-tile kit.
Notice how surprising that breakdown is for new makers: out of the \(\$1.57\) total cost to manufacture a 24-tile kit, the melted plastic accounts for \(\$1.49\) (nearly \(95\%\) of the cost), while running the heated printer for \(4.5\text{ hours}\) uses only \(8\text{ cents}\) of electricity!
That same batch-costing chain works for larger school runs—such as printing 50 gold award medals (\(14.5\text{ grams}\) each) for the Friday STEM Fair at \(\$0.02\) per gram (50 [ENTER] 14.5 [×] .02 [×] [$] \(\to\) $14.50):
| Keystroke | Register T | Register Z | Register Y | Register X | What Happens on the Stack |
|---|---|---|---|---|---|
50 |
0 | 0 | 0 | 50 | Enter total medals to print (\(50\text{ medals}\)) |
[ENTER] |
0 | 0 | 50 | 50 | Copy medal count onto Shelf \(Y\) |
14.5 |
0 | 0 | 50 | \(14.5\) | Enter weight of one medal (\(14.5\text{ g}\)) |
[×] |
0 | 0 | 0 | 725 | Multiply to find total plastic weight (\(50 \times 14.5 = 725\text{ g}\)) |
.02 |
0 | 0 | 725 | \(0.02\) | Enter filament cost per gram (\(\$0.02\) per gram) |
[×] |
0 | 0 | 0 | \(14.5\) | Multiply weight by price per gram (\(725 \times 0.02 = 14.50\)) |
[$] |
\(0.00\) | \(0.00\) | \(0.00\) | \(14.50\) | Format result in currency mode |
Shelf \(X\) displays \(\$14.50\), showing that printing all 50 STEM fair medals uses \(725\text{ grams}\) of plastic (a little under three-quarters of a \(1,000\text{-gram}\) spool) and costs just $14.50 total—less than a single store-bought trophy.
To outfit your 6-student Maker Club for the STEM Fair, the team orders a bundle of custom team hoodies and digital calipers listed at \(\$56.00\) with a \(30\%\) student discount (56 [ENTER] 30 [%] [-] [$] \(\to\) $39.20) plus \(7.5\%\) sales tax (39.20 [ENTER] 7.5 [%] [+] [$] \(\to\) $42.14). Then, when the club's total 3D-printing and hoodie supply bill comes to \(\$124.80\), you split it equally among all \(6\) members (124.80 [ENTER] [6] [÷] [$] \(\to\) $20.80):
| Keystroke | Register T | Register Z | Register Y | Register X | What Happens on the Stack |
|---|---|---|---|---|---|
56 [ENTER] |
0 | 0 | 56 | 56 | Enter regular bundle price (\(\$56.00\)) |
30 [%] |
0 | 0 | 56 | \(16.8\) | Find \(30\%\) discount (\(\$16.80\)); base \(\$56\) stays on Shelf \(Y\) |
[-] [$] |
\(0.00\) | \(0.00\) | \(0.00\) | \(39.20\) | Subtract discount and format as currency (\(\$39.20\) sale price) |
7.5 [%] |
\(0.00\) | \(0.00\) | \(39.20\) | \(2.94\) | Find \(7.5\%\) sales tax (\(\$2.94\)); \(\$39.20\) stays on Shelf \(Y\) |
[+] [$] |
\(0.00\) | \(0.00\) | \(0.00\) | \(42.14\) | Add sales tax for final bundle checkout price (\(\$42.14\)) |
124.80 [ENTER] 6 [÷] [$] |
\(0.00\) | \(0.00\) | \(42.14\) | \(20.80\) | Split the \(\$124.80\) supply bill among 6 students (\(\$20.80\) each) |
The discounted gear bundle costs $42.14 after tax, and each club member pays $20.80 for the supply bill—while Shelf \(Y\) still holds the \(\$42.14\) checkout price so you can see both totals at once.
9.1.4 3D-Printer Layer Slicing & Height Checks
Have you ever seen a 3D-printed math block with a dark slate-gray base and bright gold numbers raised on top, even though the printer only has a single nozzle? Makers do this with a technique called a filament color swap: you let the printer finish the bottom base, pause the machine, load a second color of plastic, and let it print the remaining top layers.
To program that pause at the exact right layer number in your slicer, you subtract the already-printed base height from the total model height to find the remaining upper height, and then divide by the thickness of a single plastic ribbon (\(0.02\text{ cm}\), or \(0.20\text{ mm}\)):
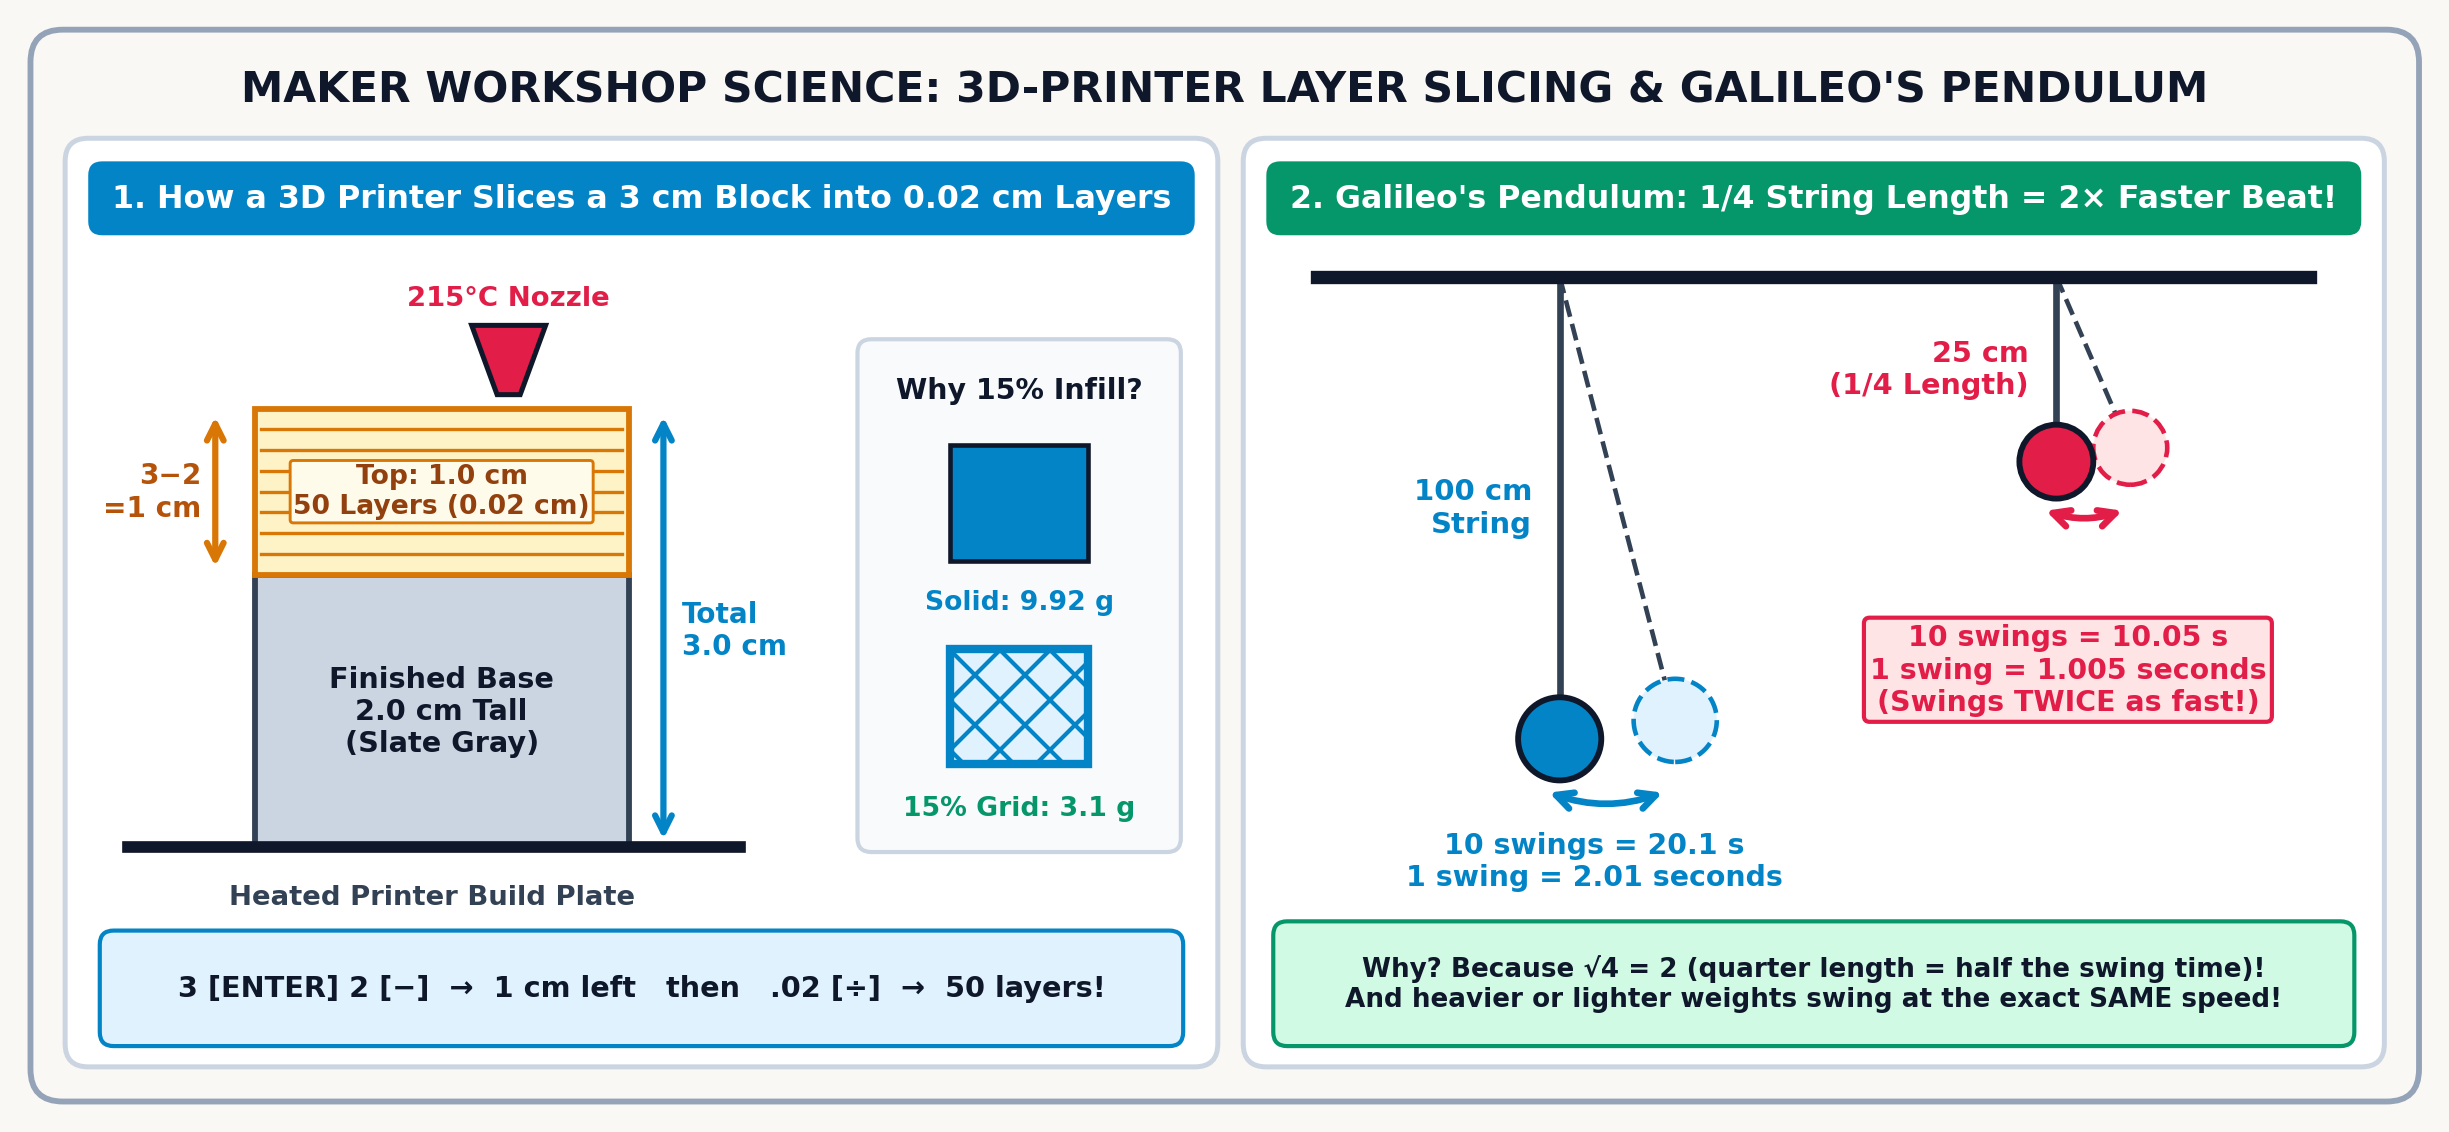
Inside your 3D printer's brass nozzle, solid PLA (polylactic acid)—a biodegradable bioplastic fermented from natural cornstarch and sugarcane—softens at \(60^\circ\text{C}\) and melts into a smooth, honey-like ribbon around \(200^\circ\text{C}\) to \(215^\circ\text{C}\), giving off a faint scent like warm breakfast waffles as it prints! Because the stepper motor lifts the nozzle by an exact \(0.02\text{ cm}\) (\(0.20\text{ mm}\)) after every horizontal pass, each new ribbon welds onto the layer below it like microscopic LEGO bricks (with a tiny cross-section of 0.020 [x²] \(\to 0.0004\text{ cm}^2\)). Just as the \(3.0\text{ cm}\) trophy screenshot at the start of this chapter left \(3 - 2 = 1.0\text{ cm}\) (\(1.0 \div 0.02 = \mathbf{50\text{ layers}}\)) above its \(2.0\text{ cm}\) base, watch how you slice a taller \(9.0\text{ cm}\) Fraction Tower holder whose solid base takes up the bottom \(3.2\text{ cm}\). Subtracting the base height via 9 [ENTER] 3.2 [-] leaves \(\mathbf{5.8\text{ cm}}\) of upper wall height, dividing by [.] 02 [÷] shows 290.0 layers, and tapping [f] [LASTX] [×] rebuilds the exact 5.8 cm height:
| Keystroke | Register T | Register Z | Register Y | Register X | What Happens on the Stack |
|---|---|---|---|---|---|
9 [ENTER] |
0 | 0 | 9 | 9 | Enter total tower height (\(9.0\text{ cm}\)) and copy to Shelf \(Y\) |
3.2 [-] |
0 | 0 | 0 | \(5.8\) | Subtract the \(3.2\text{ cm}\) base to leave \(5.8\text{ cm}\) of upper wall |
.02 [÷] |
0 | 0 | 0 | 290 | Divide by \(0.02\text{ cm}\) per layer: 290 layers needed |
[f] [LASTX] |
0 | 0 | 290 | \(0.02\) | Recall \(0.02\text{ cm}\) layer thickness; \(290\) lifts to Shelf \(Y\) |
[×] |
0 | 0 | 0 | \(5.8\) | Multiply \(290 \times 0.02 = \mathbf{5.8\text{ cm}}\) to verify the upper height |
9.1.5 Timing a Swinging Clock Pendulum
Why does a grandfather clock keep the exact same steady beat whether its swinging weight is heavy brass or light wood—and what happens to the beat if you shorten the string to one-fourth of its original length?
Over four hundred years ago, a young Galileo Galilei watched a bronze oil lamp swinging from a high cathedral ceiling in Pisa. With no stopwatch in the 1500s, Galileo pressed two fingers against his wrist and timed the swinging chandelier against his own heartbeat! Even as the swings died down from wide arcs to tiny nudges, each swing took the exact same number of pulse beats. He later proved that the time a pendulum takes to swing depends on the length of the string, not on how heavy the weight is (gravity pulls harder on a heavier bolt, but the heavier bolt has matching inertia, so the two cancel out completely!).
Because a single swing goes by so fast that your thumb on the stopwatch might be a tenth of a second early or late, clockmakers time 10 complete back-and-forth swings in a row and divide by \(10\) to find the average time for a single swing: $\(\text{One-Swing Period} = \text{Total Time for 10 Swings} \div 10, \qquad \text{Swings per Minute} = 60\text{ seconds} \div \text{One-Swing Period}\)$
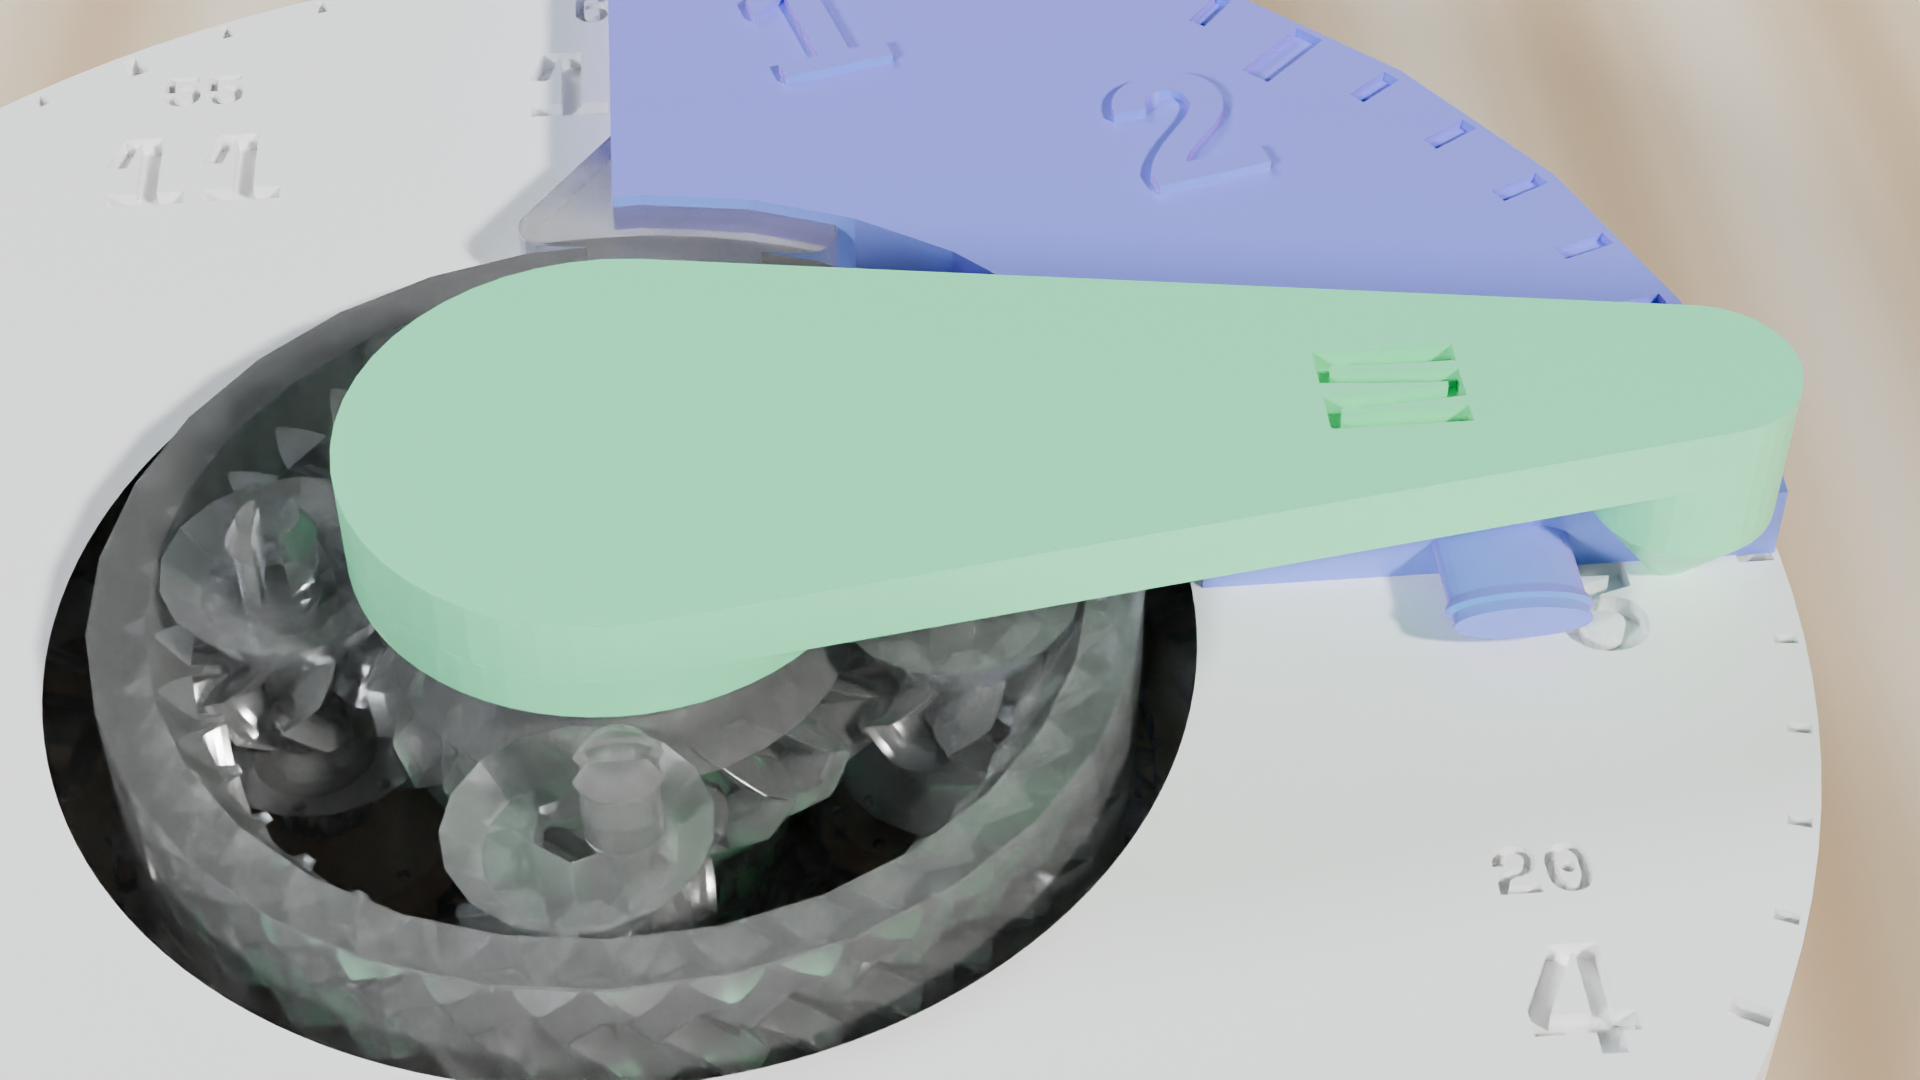
Look closely at the Planetary Geared Clock and its removable \(90^\circ\) clock quadrants above. In a mechanical grandfather clock, a swinging pendulum rocks an anchor-shaped lever (called an escapement) that releases one gear tooth on every tick, driving the \(60\text{-minute}\) outer ring and \(12:1\) planetary hour hand at a steady pace.
Run Galileo's two-length pendulum test with a washer, a string, and a stopwatch. Start with a \(100\text{ cm}\) (\(1\text{-meter}\)) string: tie a metal washer to the end, pull it aside about \(15^\circ\), and time 10 complete round-trip swings (\(20.1\text{ seconds}\)). Dividing by \(10\) (20.1 [ENTER] 10 [÷]) shrinks your thumb's reaction error tenfold to reveal 2.01 seconds per swing—and dividing into \(60\text{ seconds}\) (60 [x⇄y] [÷]) shows 29.85 swings per minute. Now test the \(25\text{ cm}\) (quarter-length) surprise: pinch the string at \(25\text{ cm}\), which is one-fourth (\(\frac{1}{4}\)) of \(100\text{ cm}\). Most people guess it will swing four times as fast, but 10 swings take \(10.05\text{ seconds}\) (10.05 [ENTER] 10 [÷] \(\to \mathbf{1.005\text{ seconds per swing}}\)). Comparing against the \(100\text{ cm}\) pendulum (2.01 [x⇄y] [÷]) lands on \(\mathbf{2.0}\): shortening the string to \(\frac{1}{4}\) made it swing twice as fast (\(\sqrt{4} = 2\)), because a pendulum's period scales with the square root of its length:
| Keystroke | Register T | Register Z | Register Y | Register X | What Happens on the Stack |
|---|---|---|---|---|---|
10.05 [ENTER] |
0 | 0 | \(10.05\) | \(10.05\) | Enter 10-swing time for the \(25\text{ cm}\) pendulum (\(10.05\text{ s}\)) |
10 [÷] |
0 | 0 | 0 | \(1.005\) | Divide by 10 swings: \(1.005\text{ seconds}\) per swing |
2.01 |
0 | 0 | \(1.005\) | \(2.01\) | Enter the \(100\text{ cm}\) pendulum's 1-swing time (\(2.01\text{ s}\)) |
[x⇄y] |
0 | 0 | \(2.01\) | \(1.005\) | Swap \(X\) and \(Y\) so \(2.01\text{ s}\) is ready to be divided by \(1.005\text{ s}\) |
[÷] |
0 | 0 | 0 | 2 | Divide \(2.01 \div 1.005 = \mathbf{2.0}\) (quarter length swings twice as fast) |
9.2 Solar Ovens, Catapults, Plant Growth & Bakery Scaling
Now let's step from the 3D printer bed to the backyard and kitchen counter, where temperature rises, launch distances, growing bean stems, and baker's dough weights all obey step-by-step stack rules.
9.2.1 The Pizza-Box Solar Oven
How can an ordinary cardboard pizza box lined with aluminum foil and clear plastic wrap trap enough sunshine to melt chocolate and marshmallows into gooey s'mores on a sunny afternoon? The shiny foil bounces extra sunlight into the box, the black paper at the bottom soaks up that light as heat, and the clear plastic window plus newspaper insulation trap the warm air inside like a greenhouse!
In 1767, the Swiss alpine naturalist Horace-Bénédict de Saussure wondered why mountain sunlight felt just as bright on top of freezing, snow-covered peaks in the Alps as it did in warm valleys below. To prove that trapped sunshine could heat air regardless of the cold mountain wind outside, he built the world's first solar oven—an insulated pine box lined with black cork under three layers of clear window glass—and watched the temperature inside climb past \(100^\circ\text{C}\) (\(212^\circ\text{F}\), the boiling point of water) while he cooked fresh fruit with pure sunlight! In your own pizza-box version of de Saussure's solar collector, you will subtract your starting temperature from your ending temperature to find the Temperature Rise, and then divide by the Heating Time in minutes to measure how many degrees Celsius your solar oven gains every single minute (\(^\circ\text{C/min}\)).
Measuring Solar Heating Speed:
Place your solar cooker in direct noon sunlight with a graham cracker, marshmallow, and dark chocolate square inside. When the air inside climbs from \(22.5^\circ\text{C}\) to \(78.0^\circ\text{C}\) over \(25\text{ minutes}\), keying 78 [ENTER] 22.5 [-] (78 [ENTER] 22.5 [-] 25 [÷]) shows a \(55.5^\circ\text{C}\) temperature rise and a heating speed of \(\mathbf{2.22^\circ\text{C per minute}}\), while 22.5 [ENTER] 78 [g] [%CHG] confirms a \(\mathbf{+246.67\%}\) jump. Angle the foil reflector flap on a compact oven to catch even more direct rays (\(20^\circ\text{C} \to 65^\circ\text{C}\) in just \(15\text{ minutes}\)), and 65 [ENTER] 20 [-] 15 [÷] clocks 3.00 °C/min (\(\mathbf{3.00^\circ\text{C/min}}\)) with a 20 [ENTER] 65 [g] [%CHG] boost of +225.0% (\(\mathbf{+225.0\%}\))!
How Well Does Newspaper Insulation Trap the Heat? How well does your rolled-up newspaper insulation around the edges of the pizza box hold onto that trapped solar warmth when a big cumulus cloud drifts across the sun? At peak noon heat, the oven reaches \(78^\circ\text{C}\) in the sun while the outdoor shade temperature is \(22^\circ\text{C}\) (so the inside of the box is \(78 - 22 = 56^\circ\text{C}\) warmer than the shade). You carry the closed solar oven into the shade for 30 minutes and check the thermometer again: it reads \(56^\circ\text{C}\) (which is still \(56 - 22 = 34^\circ\text{C}\) warmer than the \(22^\circ\text{C}\) shade!). Dividing the remaining warmth by the starting warmth gives the exact fraction of extra heat kept inside: \(\frac{56 - 22}{78 - 22} = \frac{34^\circ\text{C}}{56^\circ\text{C}} \approx \mathbf{60.71\%}\) kept inside after half an hour in the shade:
| Keystroke | Register T | Register Z | Register Y | Register X | What Happens on the Stack |
|---|---|---|---|---|---|
56 |
0 | 0 | 0 | 56 | Enter oven temperature after 30 min in shade (\(56^\circ\text{C}\)) |
[ENTER] |
0 | 0 | 56 | 56 | Copy \(56^\circ\text{C}\) up onto Shelf \(Y\) |
22 [-] |
0 | 0 | 0 | 34 | Subtract \(22^\circ\text{C}\) shade temp: \(34^\circ\text{C}\) of warmth still inside |
78 |
0 | 0 | 34 | 78 | Enter peak oven temperature (\(78^\circ\text{C}\)); \(34\) lifts to Shelf \(Y\) |
[ENTER] |
0 | 34 | 78 | 78 | Lift \(34\) to Shelf \(Z\) while copying \(78\) onto Shelf \(Y\) |
22 [-] |
0 | 0 | 34 | 56 | Subtract \(22^\circ\text{C}\) shade temp: \(56^\circ\text{C}\) starting warmth above shade |
[÷] |
0 | 0 | 0 | \(0.6071\) | Divide remaining warmth by starting warmth (\(34 \div 56 = 0.6071\)) |
100 [×] |
0 | 0 | 0 | \(60.71\) | Convert to percent: 60.71% of the extra heat stayed trapped |
9.2.2 Tabletop Catapults & Finding Your Bullseye Average
When you pull back the arm of a tabletop rubber-band catapult and launch a foam ball toward a floor target, why doesn't the ball land on the exact same millimeter every single time? Tiny differences in how your finger releases the lever create a small scatter of landing spots!
By holding your Unit Circle Volvelle (or a \(90^\circ\) quadrant from your Planetary Geared Clock) beside the catapult arm to dial in an exact pullback angle (\(30^\circ, 45^\circ,\) or \(60^\circ\)) before releasing the lever, you can measure each shot's landing distance in centimeters along a floor tape and toss every trial into [Σ+]. Why do we test \(45^\circ\) first? As Italian mathematician Niccolò Tartaglia and Galileo Galilei discovered when studying projectile arcs, a low \(30^\circ\) launch skims fast across the floor but touches down early, while a steep \(60^\circ\) launch climbs high into the air without traveling far forward—making the halfway \(45^\circ\) angle the sweet spot for maximum horizontal distance! Once your five trials are in the [Σ+] basket, [g] [x̄] and [g] [MAD] reveal both your center bullseye distance and how tightly grouped your shots are.
Launch Average & Spread at \(45^\circ\):
Tape a measuring tape down the hallway floor, set a \(45^\circ\) pullback angle with your Unit Circle Volvelle, and launch 5 shots in a row: \(182\text{ cm}, 195\text{ cm}, 188\text{ cm}, 201\text{ cm},\) and \(189\text{ cm}\). Clearing the basket ([g] [CLΣ]), logging all five chalk marks with [Σ+], and tapping [g] [x̄] then [g] [MAD] levels the five shots into a bullseye center of \(\mathbf{191.00\text{ cm}}\) (\(955 \div 5\)) with a Mean Absolute Deviation of \(\mathbf{5.60\text{ cm}}\)!
Watch the shelf-by-shelf sequence during a quick 3-shot patio calibration check (\(150\text{ cm}\), \(162\text{ cm}\), and \(156\text{ cm}\)), where [g] [CLΣ] 150 [Σ+] 162 [Σ+] 156 [Σ+] [g] [x̄] levels the three distances out to 156.00 cm:
| Keystroke | Register T | Register Z | Register Y | Register X | What Happens on the Stack |
|---|---|---|---|---|---|
[g] [CLΣ] |
0 | 0 | 0 | 0 | Clear the statistics registers |
150 [Σ+] |
0 | 0 | 0 | 1 | Add Shot 1 (\(150\text{ cm}\)); screen shows count \(= 1\) |
162 [Σ+] |
0 | 0 | 0 | 2 | Add Shot 2 (\(162\text{ cm}\)); screen shows count \(= 2\) |
156 [Σ+] |
0 | 0 | 0 | 3 | Add Shot 3 (\(156\text{ cm}\)); screen shows count \(= 3\) |
[g] [x̄] |
0 | 0 | 0 | 156 | Compute the average (mean) landing distance (\(156.00\text{ cm}\)) |
How tightly grouped were those three practice shots (\(150\text{ cm}, 162\text{ cm}, 156\text{ cm}\)) around the \(156.00\text{ cm}\) center? Shot 1 was \(6\text{ cm}\) short, Shot 2 was \(6\text{ cm}\) long, and Shot 3 landed right on the nose (\(0\text{ cm}\)). Since all three shots are still sitting in your running-total basket, one tap of [g] [MAD] via [g] [CLΣ] 150 [Σ+] 162 [Σ+] 156 [Σ+] [g] [MAD] returns 4.00 cm—confirming that \((6 + 6 + 0) \div 3 = \mathbf{4.00\text{ cm}}\) of average spread from the bullseye!
Will Your Catapult Shots Land Inside the Target Ring? Will your 5-trial catapult shots (with a center average of \(191.00\text{ cm}\) and a Mean Absolute Deviation of \(5.60\text{ cm}\)) land inside a circular floor target centered at \(190\text{ cm}\) with a radius of \(15\text{ cm}\) (stretching from \(175\text{ cm}\) on the near edge to \(205\text{ cm}\) on the far edge)?
Engineers often check a launcher's two-deviation landing zone (\(\text{Mean} \pm 2 \times \text{MAD}\)) to see where almost all shots will touch down. To find the near edge of that landing zone, enter your mean (191 [ENTER]), double your \(5.60\text{ cm}\) spread (5.60 [ENTER] 2 [×] \(\to 11.20\text{ cm}\)), and press [-] to land on \(\mathbf{179.80\text{ cm}}\)—well past the target ring's \(175\text{ cm}\) front rim. Then, because subtracting \(11.20\text{ cm}\) automatically saved \(11.20\) inside [f] [LASTX], you don't even have to type 11.20 again to check the far edge: simply enter 191, tap [f] [LASTX] to pull \(11.20\text{ cm}\) back onto Shelf \(X\), and press [+] to find the far boundary at \(\mathbf{202.20\text{ cm}}\) (while the near edge \(179.80\text{ cm}\) stays visible right above it on Shelf \(Y\)). Both edges (\(179.80\text{ cm}\) to \(202.20\text{ cm}\)) sit comfortably inside the \(175\text{ cm}\) to \(205\text{ cm}\) target ring! Now let's trade the fast arc of a catapult for the slow, steady climb of a living plant by the window.
9.2.3 Watching a Window Bean Sprout Race Toward the Sun
Have you ever planted a bean seed in a clear cup by a sunny window and noticed that it seems to grow taller overnight? Plants grow too slowly for your eyes to see in real time, like the hour hand of a clock—but when you measure the stem height in millimeters every two days, the stack lets you calculate its exact growth speed in millimeters per day!
| Observation Day | Stem Height (\(\text{mm}\)) | 2-Day Growth Gain | What the Bean Plant Is Doing |
|---|---|---|---|
| Day 2 | \(12\text{ mm}\) | \(+12\text{ mm}\) | Seed coat splits; arched green stem ("hypocotyl") peeks up |
| Day 4 | \(28\text{ mm}\) | \(+16\text{ mm}\) | White root network anchors into the damp paper towel |
| Day 6 | \(49\text{ mm}\) | \(+21\text{ mm}\) | First pair of solar-panel leaves unfold to catch window light |
| Day 8 | \(74\text{ mm}\) | \(+25\text{ mm}\) | Leaves convert sunlight and water into fast stem growth |
| Day 10 | \(105\text{ mm}\) | \(+31\text{ mm}\) | Peak growth spurt as second leaf tier opens |
| Day 12 | \(138\text{ mm}\) | \(+33\text{ mm}\) | Tall stem thickens and reaches toward the window glass |
| Day 14 | \(172\text{ mm}\) | \(+34\text{ mm}\) | Full \(17.2\text{ cm}\) seedling ready for a garden pot |
Look closely at the 14-day sprout log above: once the first green leaves unfold after Day 4, the sprout shoots up from \(28\text{ mm}\) on Day 4 to \(105\text{ mm}\) on Day 10! Dividing the height gain by the elapsed days (105 [ENTER] 28 [-] 10 [ENTER] 4 [-] [÷]) shows that the stem climbed \(77\text{ mm} \div 6\text{ days} \approx \mathbf{12.83\text{ mm/day}}\)—and comparing the Day 14 height (\(172\text{ mm}\)) against Day 2 (\(12\text{ mm}\)) with 12 [ENTER] 172 [g] [%CHG] reveals a \(\mathbf{+1333.33\%}\) jump!
Watch how both measurements—daily growth speed and percentage growth—chain together on a second sprout that grew from \(15\text{ mm}\) to \(75\text{ mm}\) over \(5\text{ days}\). Finding the daily growth speed with 75 [ENTER] 15 [-] [5] [÷] yields 12.0 mm/day, and checking the percentage growth via 15 [ENTER] 75 [g] [%CHG] confirms +400.0%:
| Keystroke | Register T | Register Z | Register Y | Register X | What Happens on the Stack |
|---|---|---|---|---|---|
75 |
0 | 0 | 0 | 75 | Enter ending sprout height (\(75\text{ mm}\)) |
[ENTER] |
0 | 0 | 75 | 75 | Copy ending height onto Shelf \(Y\) |
15 |
0 | 0 | 75 | 15 | Enter starting sprout height (\(15\text{ mm}\)) |
[-] |
0 | 0 | 0 | 60 | Subtract to find total height gained (\(75 - 15 = 60\text{ mm}\)) |
5 |
0 | 0 | 60 | 5 | Enter number of growing days (\(5\text{ days}\)) |
[÷] |
0 | 0 | 0 | 12 | Divide height gained by days (\(60 \div 5 = 12.0\text{ mm/day}\)) |
15 [ENTER] |
0 | 12 | 15 | 15 | Enter starting height (\(15\text{ mm}\)) onto Shelf \(Y\) |
75 [g] [%CHG] |
0 | 12 | 15 | 400 | Find percent increase from \(15\text{ mm}\) to \(75\text{ mm}\) (\(+400.0\%\)) |
Shelf \(X\) shows a total growth of \(\mathbf{+400.0\%}\) (\(60\text{ mm}\) of new stem divided by the \(15\text{ mm}\) starting height is \(4\) full times more height, so the plant now stands \(5\times\) as tall as on Day 1), while Shelf \(Z\) still holds its daily speed of \(\mathbf{12.0\text{ mm/day}}\).
9.2.4 Scaling Bread & Smoothie Recipes
Why do professional bread and pizza bakers weigh their ingredients in grams on a digital kitchen scale instead of scooping flour with measuring cups—and why do they call the flour weight \(100\%\) even when all the ingredients add up to \(171.5\%\)?
If you scoop flour with a cup, packing the flour tightly can sneak \(30\) extra grams into the bowl and make your pizza crust or bread loaf dry and heavy. With Baker's Percentages, the flour is always the \(100\%\) anchor, and every other ingredient (water, yeast, salt) is simply a percentage of the flour weight. That means you can scale a recipe to feed 4 people or 400 people in seconds.
| Ingredient | Baker's Percentage |
|---|---|
| Bread Flour | \(100.0\%\) (Base Ingredient) |
| Water (Hydration) | \(68.0\%\) |
| Yeast | \(1.5\%\) |
| Salt | \(2.0\%\) |
| Total Formula | \(171.5\%\) |
Scaling Multi-Loaf Bakery Batches:
Because the SC-6 percentage key [%] calculates a percentage of Shelf \(Y\) without erasing Shelf \(Y\), your \(100\%\) flour anchor stays alive on Shelf \(Y\) for every ingredient! To bake 7 loaves (\(500\text{ g}\) flour each) for a 28-guest dinner, multiplying 500 [ENTER] 7 [×] sets your \(100\%\) flour anchor at \(\mathbf{3,500\text{ g}}\), and then 3500 [ENTER] 68 [%] (\(\mathbf{2,380\text{ g}}\) water at \(68\%\)), 3500 [ENTER] 2 [%] (\(\mathbf{70\text{ g}}\) salt at \(2\%\)), and 3500 [ENTER] 1.5 [%] (\(\mathbf{52.5\text{ g}}\) yeast at \(1.5\%\)) measure every ingredient from that same \(3,500\text{ g}\) anchor (\(\mathbf{6,002.5\text{ g}}\) total dough).
Watch all four stack shelves in action when you scale twelve golden loaves of country sourdough (\(450\text{ g}\) flour per loaf, \(65\%\) water, \(2\%\) salt): finding total flour (450 [ENTER] 12 [×] \(\to\) 5,400 grams), \(65\%\) water (5400 [ENTER] 65 [%] \(\to\) 3,510 grams), and \(2\%\) salt (5400 [ENTER] [2] [%] \(\to\) 108 grams) keeps every weight visible at once:
| Keystroke | Register T | Register Z | Register Y | Register X | What Happens on the Stack |
|---|---|---|---|---|---|
450 [ENTER] |
0 | 0 | 450 | 450 | Enter flour weight for 1 loaf (\(450\text{ g}\)) |
12 [×] |
0 | 0 | 0 | 5400 | Multiply by 12 loaves to find total flour (\(5,400\text{ g}\)) |
65 [%] |
0 | 0 | 5400 | 3510 | Find \(65\%\) of \(5,400\text{ g}\) for water (\(3,510\text{ g}\)); \(5,400\) stays on Shelf \(Y\) |
5400 [ENTER] |
5400 | 3510 | 5400 | 5400 | Place the \(5,400\text{ g}\) flour base on Shelf \(Y\) |
2 [%] |
5400 | 3510 | 5400 | 108 | Find \(2\%\) of \(5,400\text{ g}\) for salt (\(108\text{ g}\)) |
Look at all four stack shelves at the end of the sequence: Shelf \(X\) holds your \(\mathbf{108\text{ grams}}\) of salt, Shelves \(Y\) and \(T\) hold your \(\mathbf{5,400\text{ grams}}\) of flour, and Shelf \(Z\) still holds your \(\mathbf{3,510\text{ grams}}\) of water—all three recipe weights visible at once without writing a single number on a flour-dusted notepad.
Scaling Down a Liquid Measuring Cup Recipe with Fraction Towers: What if a cookbook recipe uses fractional measuring cups and you want to make a smaller or larger batch? Take a Saturday-morning pancake recipe that calls for \(1\ \frac{3}{4}\) cups of milk to make 8 fluffy pancakes, when you are making breakfast for just two people (\(2\) pancakes, or \(\frac{2}{8} = \frac{1}{4}\) of the recipe).
Before touching the keypad, picture this with your Fraction Towers right beside your glass measuring pitcher: \(1\) whole tower plus three \(\frac{1}{4}\) blocks equals seven \(\frac{1}{4}\) blocks (\(\frac{7}{4}\)). When you divide that stack by \(4\), you are splitting each \(\frac{1}{4}\) block into 4 equal pieces, which turns fourths into sixteenths (\(\frac{7}{16}\) of a cup)! On your SC-6, entering the mixed fraction with 1 [.] 3 [.] 4 [ENTER] stages \(1\ \frac{3}{4}\) (\(7/4 = 1.75\)) onto Shelf \(Y\), and dividing by 4 [÷] lands directly on 7/16 cup of milk (\(0.4375\text{ cup}\))—which is just a splash under the \(\frac{1}{2}\text{-cup}\) (\(8/16\)) mark, or exactly \(7\text{ tablespoons}\) since there are \(16\text{ tablespoons}\) in \(1\text{ cup}\)!
Now try scaling up and down for two STEM Bake Sale treats! First, a single batch of trail-mix granola bars calls for \(2\ \frac{1}{4}\) cups of rolled oats, and you need \(4\) batches for the bake sale table.
Picture \(2\ \frac{1}{4} \times 4\) with your Fraction Towers: four \(2\)-whole towers make \(8\) wholes, and four \(\frac{1}{4}\) blocks snap together into \(1\) more whole tower (\(8 + 1 = 9\)). Checking on the SC-6 using mixed-fraction entry via 2 [.] 1 [.] 4 [ENTER] [4] [×] [a ᵇ/c] confirms 9 cups—multiplying \(2\ \frac{1}{4}\) by \(4\) gives an exact \(\mathbf{9\text{ cups}}\) of oats!
Second, to wash down the warm granola bars, you blend \(3\ \frac{1}{2}\) cups of berry smoothie and pour it equally into \(4\) tasting cups for your baking team. Picture \(3\ \frac{1}{2}\) as seven \(\frac{1}{2}\text{-cup}\) blocks (\(7/2\)): when you slice each half-cup into 4 equal shares, halves turn into eighths (\(7/8\)). Dividing the mixed-number volume by 4 on the stack with 3 [.] 1 [.] 2 [ENTER] [4] [÷] [a ᵇ/c] gives 7/8 cup:
| Keystroke | Register T | Register Z | Register Y | Register X | What Happens on the Stack |
|---|---|---|---|---|---|
3 [.] 1 [.] 2 |
0 | 0 | 0 | \(3\ 1/2\) | Enter mixed number \(3\ \frac{1}{2}\) cups |
[ENTER] |
0 | 0 | \(3\ 1/2\) | \(3\ 1/2\) | Push \(3\ \frac{1}{2}\) onto Shelf \(Y\) |
4 |
0 | 0 | \(3\ 1/2\) | 4 | Enter 4 equal cups |
[÷] |
0 | 0 | 0 | \(7/8\) | Divide \(3\ \frac{1}{2} \div 4 = 7/8\) cup |
[FDISP] |
0 | 0 | 0 | \(0.875\) | Toggle between exact fraction 7/8 and decimal 0.875 |
Each tasting cup gets \(\mathbf{7/8\text{ cup}}\) (\(0.875\text{ cup}\)) of smoothie—just one eighth of a cup shy of a full cup, so you can pour it right up to the \(\frac{3}{4}\text{-cup}\) plus \(\frac{1}{8}\text{-cup}\) line on your kitchen pitcher!
9.3 Gears, Hydraulics, Drones & Solar Tilt
With our kitchen and backyard experiments logged, we are ready to build mechanical and electrical machines—exploring how gear trains and water syringes multiply force, and how drone pilots and solar engineers budget electrical energy.
9.3.1 How Bicycle & Robot Gears Trade Speed for Super-Strength
How can a tiny electric motor that spins super fast—but is weak enough to stop with your finger—lift a heavy crate or turn the hands of a clock when you connect it through a train of gears?
In the 1490s, Renaissance artist and inventor Leonardo da Vinci filled his Codex Madrid notebooks with detailed drawings of interlocking wooden and brass gear wheels—showing his workshop apprentices that every mesh between a small gear and a big gear is really a fraction and a ratio you can count with your fingertips! You feel this exact gear math in your legs every time you click the thumb-shifter on a multi-speed bicycle: when you pedal up a steep hill, the bicycle's rear derailleur guides the steel chain onto a wide, many-toothed sprocket on the back wheel so your legs spin easily while multiplying your climbing force; on a flat road, shifting to a tiny 12-tooth rear sprocket makes one turn of your pedals spin the back wheel three or four times for top speed!
When two gear wheels mesh directly together, their teeth lock one tooth at a time. When a small Driver Gear with only \(12\) teeth meshes with a big Driven Gear that has \(36\) teeth, one full spin of the small gear only pushes \(12\) teeth around the edge of the big gear. Because \(36 \div 12 = 3\), the small gear has to spin \(3\) full times just to turn the big gear once! The big gear spins \(3\) times slower, but it pushes with \(3\) times the lifting strength.
What if \(3\) times stronger still isn't strong enough to lift a heavy robot arm? Instead of building one gigantic gear the size of a dinner plate, engineers connect two gear pairs in a row on a shared middle axle—just like the hidden gears inside your Planetary Geared Clock:
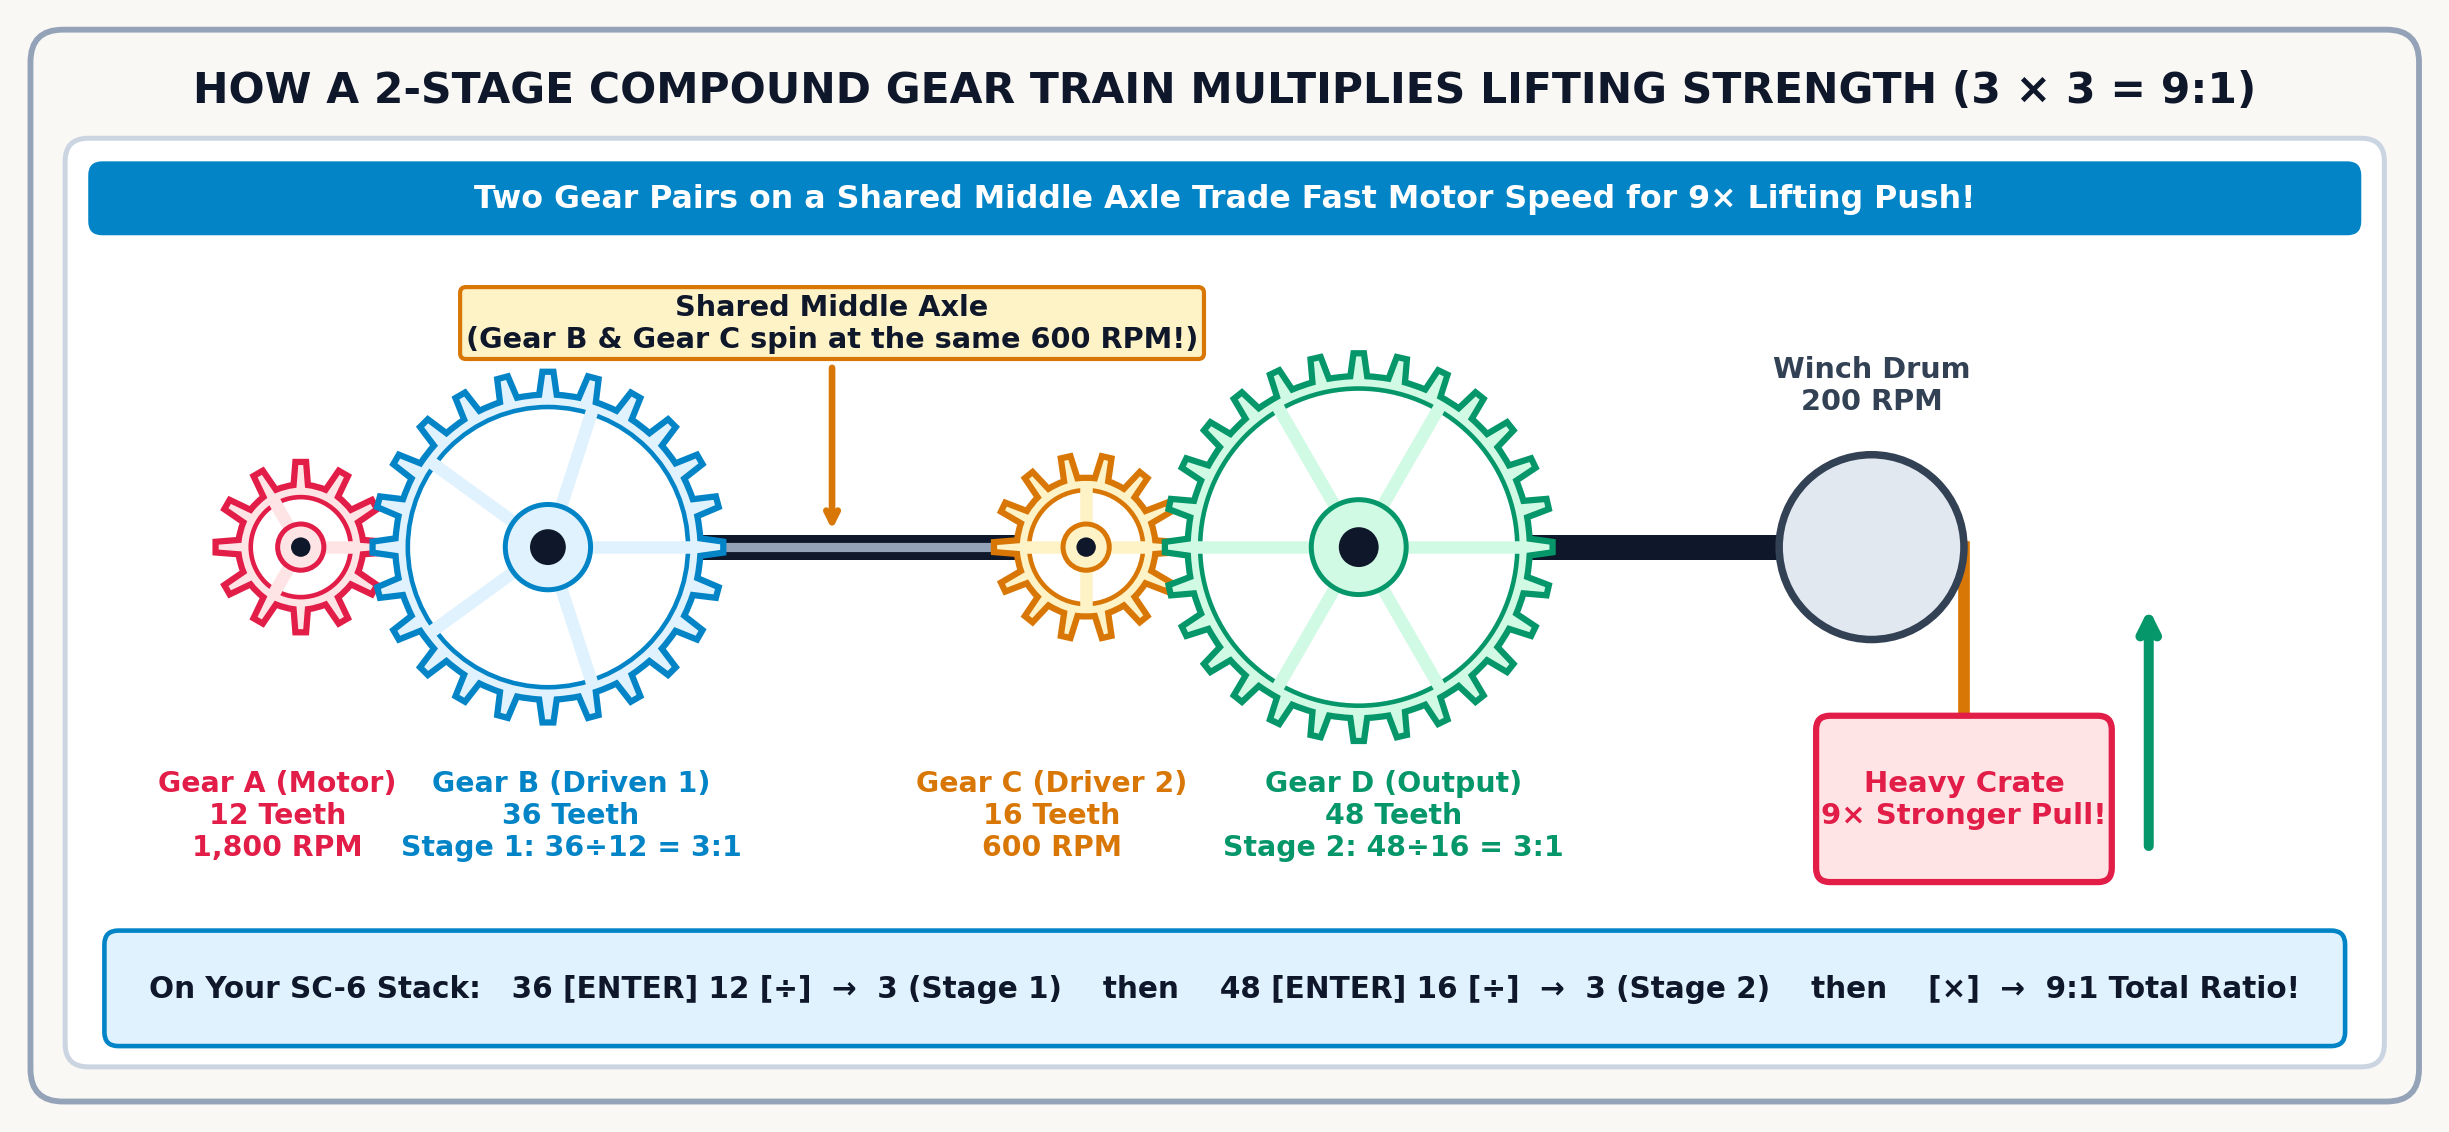
Look at the diagram above to see how each stage hands off the push. In Stage 1 (Red to Blue), Small Gear A (\(12\text{ teeth}\)) turns Big Gear B (\(36\text{ teeth}\)): dividing 36 [ENTER] 12 [÷] (36 [ENTER] 12 [÷]) gives a 3.0 (\(3:1\)) ratio, slowing an \(1,800\text{ RPM}\) motor down to \(600\text{ RPM}\) and multiplying its strength by \(3\times\).
Next, in Stage 2 on the Shared Middle Axle (Gold to Green), Small Gear C (\(16\text{ teeth}\)) is locked onto the same rod as Gear B and turns Big Gear D (\(48\text{ teeth}\)). Dividing 48 [ENTER] 16 [÷] (48 [ENTER] 16 [÷]) places the second 3.0 on Shelf \(X\) while holding Stage 1's 3.0 on Shelf \(Y\), and tapping [×] multiplies them into a 9.0 (\(9:1\)) compound reduction—slowing the winch drum to \(1800 \div 9 = \mathbf{200\text{ RPM}}\) with \(9\times\) the pulling muscle! (If you accidentally hook the motor to the big gear first, you get \(12 \div 36 = 0.3333\)—one tap of [x⇄y] before [÷] flips the tooth counts back into place.)
$\(\text{Total Gear Ratio} = (\text{Stage 1 Driven Teeth} \div \text{Stage 1 Driver Teeth}) \times (\text{Stage 2 Driven Teeth} \div \text{Stage 2 Driver Teeth})\)$
| Reduction Stage | Driver Gear | Driven Gear | Stage Ratio |
|---|---|---|---|
| Stage 1 (Input Shaft) | Gear A (\(12\text{ teeth}\)) | Gear B (\(36\text{ teeth}\)) | \(36 \div 12 = 3:1\) |
| Stage 2 (Middle Shaft) | Gear C (\(16\text{ teeth}\)) | Gear D (\(48\text{ teeth}\)) | \(48 \div 16 = 3:1\) |
| Compound Output | — | — | \(3 \times 3 = 9:1\) |
What if your robotics team tests a single \(4:1\) gear pair first (\(16\text{-tooth}\) driver turning a \(64\text{-tooth}\) driven gear via 64 [ENTER] 16 [÷] \(\to\) 4.0 : 1), and then builds a two-stage winch where Stage 1 is \(40 \div 10\) (\(4:1\)) and Stage 2 is \(30 \div 15\) (\(2:1\))? Watch how Shelf \(Z\) holds Stage 1 (4) while you divide Stage 2 (30 ÷ 15 = 2), then multiplies both stages (40 [ENTER] 10 [÷] 30 [ENTER] 15 [÷] [×] \(\to\) 8.0 : 1):
| Keystroke | Register T | Register Z | Register Y | Register X | What Happens on the Stack |
|---|---|---|---|---|---|
40 [ENTER] 10 [÷] |
0 | 0 | 0 | 4 | Stage 1 gear ratio: \(40 \div 10 = 4.0\) |
30 [ENTER] |
0 | 4 | 30 | 30 | Enter Stage 2 driven gear (\(30\text{ teeth}\)); lifts \(4\) onto Shelf \(Z\) |
15 [÷] |
0 | 0 | 4 | 2 | Stage 2 gear ratio: \(30 \div 15 = 2.0\); drops \(4\) onto Shelf \(Y\) |
[×] |
0 | 0 | 0 | 8 | Multiply Stage 1 by Stage 2: \(4 \times 2 = 8.0\) |
Shelf \(X\) displays \(8.0\), proving that the two-stage gear train gives an \(\mathbf{8.0 : 1}\) strength boost—trading eight fast turns of the motor shaft for one slow, high-torque turn of the winch drum.
9.3.2 Lifting Heavy Books with Water Syringes
How can a gentle push from your thumb on a small water-filled plastic syringe lift a heavy stack of dictionaries sitting on top of a wide syringe? In 1646, the young French scientist Blaise Pascal (1623–1662) staged a dramatic experiment to prove that water transmits pressure equally in every direction. Pascal attached a tall, skinny vertical tube no wider than a drinking straw to the lid of a heavy, water-filled oak barrel. When he climbed a ladder and poured just a single cup of water down that skinny tube, the water pressure multiplied across the wide barrel walls so powerfully that the heavy oak staves burst open!
You can harness Pascal's water-pressure multiplier right on your desk—without bursting any barrels! Connect a narrow \(1.0\text{ cm}\) master syringe to a wide \(3.0\text{ cm}\) lifting syringe with clear vinyl tubing filled with water. When you push the small plunger, the water carries your pressure equally to every square centimeter of the big plunger—the exact same hydraulic principle that lets a driver stop a \(4,000\text{-pound}\) car with one foot on the brake pedal.
Why does making the big plunger \(3\times\) wider multiply your lifting push by \(9\times\) instead of \(3\times\)?
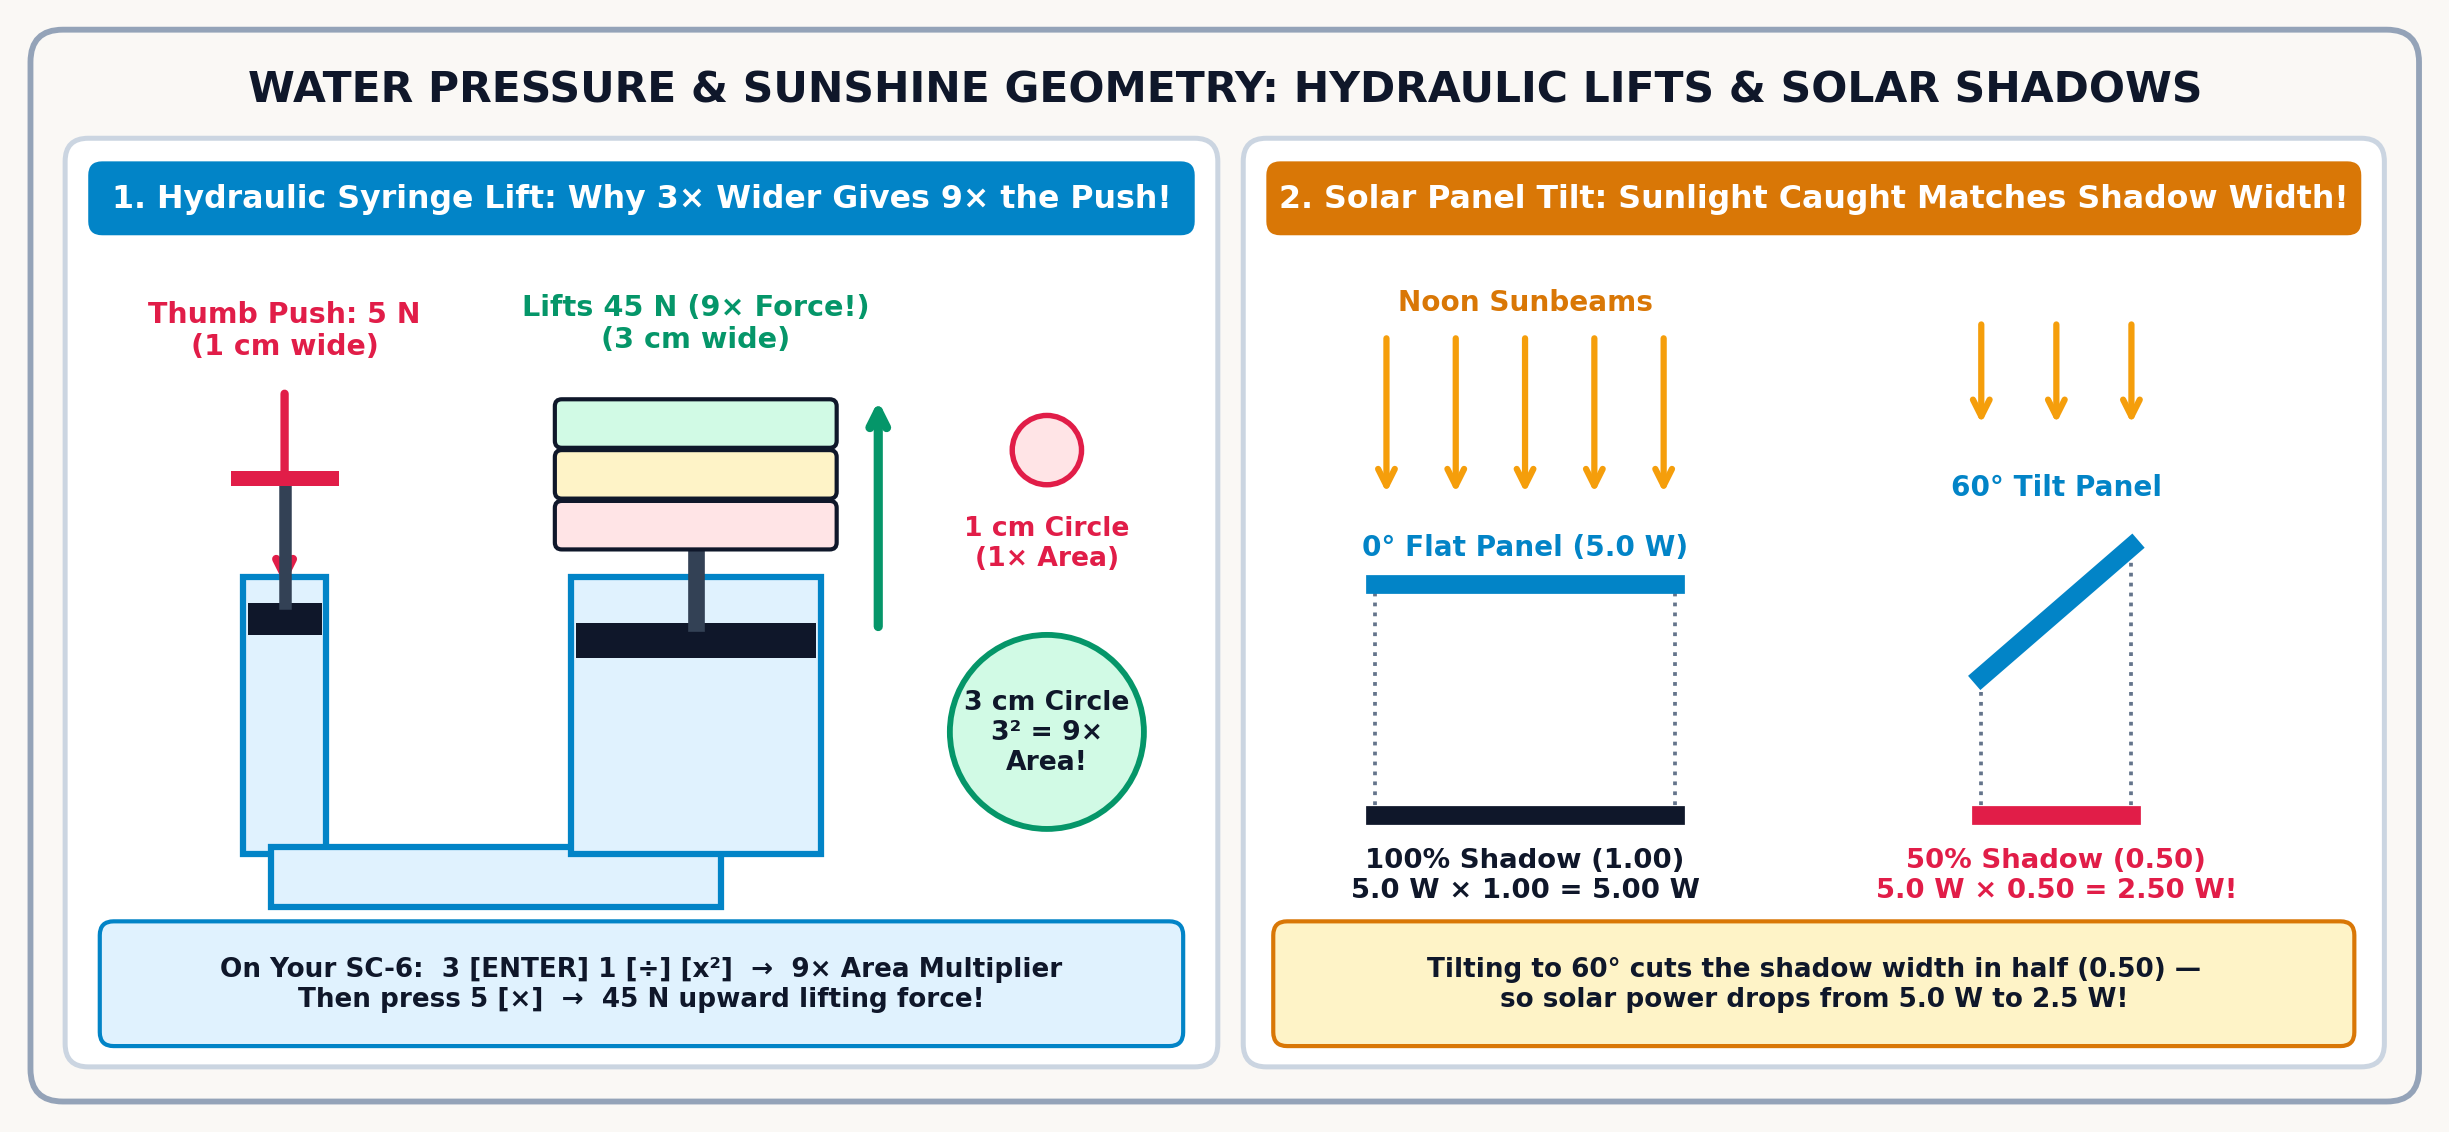
Look at the water-pressure diagram above: a syringe plunger is a circle, and just like you discovered in Chapter 6, a circle's area grows with the square of its width. When you divide the \(3.0\text{ cm}\) wide plunger by the \(1.0\text{ cm}\) narrow plunger (3 [ENTER] 1 [÷] \(\to 3.0\)) and tap [x²], its circular face packs 9.0 times the area—turning your gentle thumb push into nine times the upward lifting force (\(\text{Output Lift} = 9 \times \text{Thumb Push}\)), the exact same hydraulic secret that powers giant yellow excavators and fire-truck aerial ladders. What is the trade-off for getting \(9\times\) the push? Watch the water inside the vinyl tube! Because the big syringe has \(9\times\) the circle area, pushing the small \(1.0\text{ cm}\) plunger down by \(9.0\text{ cm}\) only raises the big \(3.0\text{ cm}\) plunger by \(1.0\text{ cm}\). Just like a \(9:1\) gear train trades 9 fast turns for 1 super-strong turn, a hydraulic syringe lift trades \(9\times\) the push distance for \(9\times\) the lifting strength!
Now test that \(9\times\) hydraulic multiplier under a stack of heavy hardcover dictionaries! If you press the small plunger with a gentle thumb force of \(5.0\text{ Newtons}\) (about half a kilogram of push), how many Newtons of upward force—and how many kilograms of books (where \(1\text{ kg}\) weighs \(9.8\text{ Newtons}\) in Earth's gravity)—can the large syringe raise? Multiply the \(9\times\) area multiplier by your \(5.0\text{ N}\) thumb push (9 [ENTER] 5.0 [×]) to reach \(\mathbf{45.0\text{ Newtons}}\) of upward lift, then divide by Earth's gravity (9.8 [÷]) to land on \(\mathbf{4.59\text{ kg}}\) (over \(10\text{ pounds}\) of books lifted with one thumb!):
| Keystroke | Register T | Register Z | Register Y | Register X | What Happens on the Stack |
|---|---|---|---|---|---|
9 [ENTER] |
0 | 0 | 9 | 9 | Enter the \(9\times\) syringe area multiplier onto Shelf \(Y\) |
5.0 [×] |
0 | 0 | 0 | \(45.0\) | Multiply by your \(5.0\text{ N}\) thumb push: \(45.0\text{ Newtons}\) of lift |
9.8 [÷] |
0 | 0 | 0 | \(4.59\) | Divide by gravity (\(9.8\text{ N/kg}\)): lifts 4.59 kg of books |
9.3.3 Quadcopter Drone Batteries & Safe Flight Timers
Why do drone pilots always set a countdown timer to land when their rechargeable battery still has \(20\%\) charge left—and how can you predict your exact hover time before spinning up the propellers?
Think of a drone battery's milliamp-hour (\(\text{mAh}\)) rating like a fuel tank of electrical energy, and the four motors' current draw (\(\text{mA}\)) like how fast the motors sip from that tank. Inside a quadcopter's lightweight lithium-polymer (LiPo) battery pack, microscopic lithium ions shuttle back and forth through a polymer gel: if you ever drain the pack all the way to \(0\%\), the chemical layers inside puff up with gas and permanently lose their ability to hold a charge, while the sudden voltage drop mid-flight leaves the propellers without enough power to cushion your landing! That is why aerospace engineers and RC pilots always follow the \(80\%\) Safe Battery Rule—multiplying the battery's capacity by \(0.80\) (so \(20\%\) stays untouched in reserve), multiplying by \(60\text{ minutes per hour}\), and dividing by the hover current in milliamps: $\(\text{Safe Flight Time (Minutes)} = (\text{Battery Capacity in mAh} \times 0.80 \times 60\text{ minutes}) \div \text{Hover Current in mA}\)$
On a lightweight \(850\text{ mAh}\) pack whose motors draw \(4,200\text{ mA}\) (850 [ENTER] 0.8 [×] 60 [×] 4200 [÷]), you get \(9.714\text{ minutes}\) (\(9\text{ min } 43\text{ s}\) via [g] [▸HMS]) of safe flight—or \(7.418\text{ minutes}\) (\(\mathbf{-23.64\%}\) via [g] [%CHG]) if a \(45\text{-gram}\) action camera raises the motor draw to \(5,500\text{ mA}\).
To get more flight time back when carrying a custom 3D-printed prop-guard frame (\(5,000\text{ mA}\) draw), upgrade to a larger \(1,200\text{ mAh}\) battery! Following the \(80\%\) safe battery rule (1200 [ENTER] .8 [×] 60 [×] 5000 [÷]) lands on 11.52 min:
| Keystroke | Register T | Register Z | Register Y | Register X | What Happens on the Stack |
|---|---|---|---|---|---|
1200 [ENTER] |
0 | 0 | 1200 | 1200 | Enter battery capacity (\(1,200\text{ mAh}\)) |
.8 [×] |
0 | 0 | 0 | 960 | Multiply by \(0.80\) safe battery rule: \(960\text{ mAh}\) usable |
60 [×] |
0 | 0 | 0 | 57600 | Multiply by \(60\text{ minutes per hour}\) (\(57,600\text{ mA}\cdot\text{min}\)) |
5000 |
0 | 0 | 57600 | 5000 | Enter hover current draw (\(5,000\text{ mA}\)) |
[÷] |
0 | 0 | 0 | \(11.52\) | Divide usable battery by current (\(57,600 \div 5,000 = 11.52\text{ min}\)) |
The bottom line displays \(11.52\text{ minutes}\) (\(11\text{ minutes}\) and \(0.52 \times 60 \approx 31\text{ seconds}\)), showing that the upgraded \(1,200\text{ mAh}\) battery lets the quadcopter safely hover for 11 minutes 31 seconds before the landing timer beeps.
9.3.4 Solar Panel Tilt Angle & Sunlight Shadow Factor
Why does a solar panel make full power when aimed straight at the noon sun (\(0^\circ\) tilt), yet drop to half power when tilted at \(60^\circ\)? Try this experiment on your desk right now: hold a flashlight straight down (\(0^\circ\)) over a sheet of graph paper and count how many squares the bright circle of light covers. Now tilt the flashlight at a steep \(60^\circ\) angle: that exact same beam of light stretches out into an oval twice as wide, spreading its energy thin across twice as many squares! Conversely, if you hold a flat solar panel under the noon sun and tilt it slowly, the shadow it casts on the table directly underneath gets narrower and narrower.
A solar panel only catches as much beam width of sunshine as its flat shadow—and you can read that exact Sunlight Shadow Factor right off your 3D-printed Unit Circle Volvelle. When you turn the pointer of the Unit Circle Volvelle to \(0^\circ, 30^\circ, 45^\circ,\) or \(60^\circ\), the horizontal window displays the shadow factor (\(1.0000, 0.8660, 0.7071,\) and \(0.5000\)), showing the exact decimal fraction of direct sunlight caught by the tilted panel.
Solar Power at Different Tilt Angles:
Set a classroom solar panel on a sunny windowsill where it produces \(5.00\text{ Watts}\) when pointed straight at the sun (\(0^\circ\) tilt). How many Watts does it produce when the sun strikes it at tilt angles of \(30^\circ, 45^\circ,\) and \(60^\circ\)? By staging the panel's \(5.0\text{-Watt}\) peak rating on Shelf \(Y\) (5 [ENTER]) and multiplying by the Volvelle shadow factor on Shelf \(X\), you can test all three angles in seconds. At a gentle \(30^\circ\) tilt (shadow factor \(0.8660\)), multiplying via 5 [ENTER] 0.866 [×] yields \(\mathbf{4.33\text{ Watts}}\)—showing that even a \(30^\circ\) angle still captures \(86.6\%\) of peak sunshine! At a medium \(45^\circ\) tilt (shadow factor \(0.7071\)), keying in 5 [ENTER] 0.7071 [×] gives \(\mathbf{3.54\text{ Watts}}\) (\(70.7\%\) of peak). And at a steep \(60^\circ\) tilt (shadow factor \(0.5000\)), pressing 5 [ENTER] .5 [×] lands on an exact \(\mathbf{2.50\text{ Watts}}\) (\(50.0\%\)—half the shadow width means half the electrical power):
| Panel Tilt Angle | Sunlight Shadow Factor (from Volvelle) | Peak Watts | Output Power (\(\text{Peak} \times \text{Factor}\)) | Percent of Peak |
|---|---|---|---|---|
| \(0^\circ\) (Flat to the Sun) | \(1.0000\) | \(5.00\text{ W}\) | \(\mathbf{5.00\text{ W}}\) | \(100.0\%\) |
| \(30^\circ\) Tilt | \(0.8660\) | \(5.00\text{ W}\) | \(\mathbf{4.33\text{ W}}\) | \(86.6\%\) |
| \(45^\circ\) Tilt | \(0.7071\) | \(5.00\text{ W}\) | \(\mathbf{3.54\text{ W}}\) | \(70.7\%\) |
| \(60^\circ\) Tilt | \(0.5000\) | \(5.00\text{ W}\) | \(\mathbf{2.50\text{ W}}\) | \(50.0\%\) |
That shadow-factor table explains why rooftop solar installers tilt fixed solar panels to match a city's latitude on Earth—tilting panels around \(30^\circ\) in southern cities like Austin, New Orleans, or Cairo, and around \(45^\circ\) in northern cities like Minneapolis, Portland, or Milan—so the panel faces as squarely as possible into the noon sun all year round!
Adding Up a Full School Day of Solar Energy: As the sun arcs across the sky from morning to afternoon, how much total electrical energy does your panel collect over an 8-hour school day? In the morning (9:00 AM to 12:00 PM, \(60^\circ\) tilt), the panel produces \(2.50\text{ Watts}\) for \(3\text{ hours}\) (\(7.50\text{ Watt-hours}\)). Around noon (12:00 PM to 2:00 PM, \(0^\circ\) tilt), it produces a full \(5.00\text{ Watts}\) for \(2\text{ hours}\) (\(10.00\text{ Watt-hours}\)). And in the afternoon (2:00 PM to 5:00 PM, \(45^\circ\) tilt), it produces \(3.54\text{ Watts}\) for \(3\text{ hours}\) (\(10.62\text{ Watt-hours}\)).
Instead of jotting down subtotals on paper, you can clear your statistics basket with [g] [CLΣ], multiply the Watts by the hours for each part of the day (2.5 [ENTER] 3 [×] [Σ+] for morning, 5 [ENTER] 2 [×] [Σ+] for noon, and 3.54 [ENTER] 3 [×] [Σ+] for afternoon), and tap [f] [Σx] to ring up the full day's harvest of \(\mathbf{28.12\text{ Watt-hours}}\)—then divide by 1000 [÷] to convert into \(\mathbf{0.02812\text{ kWh}}\):
| Keystroke | Register T | Register Z | Register Y | Register X | What Happens on the Stack |
|---|---|---|---|---|---|
[g] [CLΣ] |
0 | 0 | 0 | 0 | Clear the statistics basket before starting the daily log |
2.5 [ENTER] 3 [×] |
0 | 0 | 0 | \(7.5\) | Morning energy: \(2.50\text{ W} \times 3\text{ hours} = 7.50\text{ Wh}\) |
[Σ+] |
0 | 0 | 0 | \(1.0000\) | Toss morning energy into the basket (\(\text{Count} = 1\)) |
5 [ENTER] 2 [×] |
0 | 0 | 0 | \(10.0\) | Noon energy: \(5.00\text{ W} \times 2\text{ hours} = 10.00\text{ Wh}\) |
[Σ+] |
0 | 0 | 0 | \(2.0000\) | Toss noon energy into the basket (\(\text{Count} = 2\)) |
3.54 [ENTER] 3 [×] |
0 | 0 | 0 | \(10.62\) | Afternoon energy: \(3.54\text{ W} \times 3\text{ hours} = 10.62\text{ Wh}\) |
[Σ+] |
0 | 0 | 0 | \(3.0000\) | Toss afternoon energy into the basket (\(\text{Count} = 3\)) |
[f] [Σx] |
0 | 0 | 0 | \(28.12\) | Sum all three periods: 28.12 Watt-hours total |
1000 [÷] |
0 | 0 | 0 | \(0.02812\) | Divide by 1,000 to convert into 0.02812 kWh |
9.4 The Maker's Notebook, Wind Tunnels & Weekend Challenges
Real makers always check how close their physical measurements come to their design target. In this closing section, we will check Percent Error, 3D-Printing Snap-Fit Clearance, and Archimedes' Density Fingerprint, and then see how the Wright brothers used a bicycle-shop wind tunnel and triangle trusses to build the first airplane.
9.4.1 Maker Lab Engineering Notebook & Measurement Checks
To check your accuracy at the workbench, compare your measured value against the target value using:
Checking Percent Error on a Precision Calibration Block:
A precision 3D-printed calibration bar has a CAD target weight of \(9.80665\text{ grams}\), and your digital scale measures \(9.7716\text{ grams}\). How close is your print in percent? Because subtracting \(9.80665\) automatically saves \(9.80665\) inside [f] [LASTX], tapping [f] [LASTX] [÷] divides by the target value right away without making you type that six-digit number a second time.
| Keystroke | Register T | Register Z | Register Y | Register X | What Happens on the Stack |
|---|---|---|---|---|---|
9.7716 |
0 | 0 | 0 | \(9.7716\) | Enter the measured scale weight (\(9.7716\text{ g}\)) |
[ENTER] |
0 | 0 | \(9.7716\) | \(9.7716\) | Copy measured weight up onto Shelf \(Y\) |
9.80665 |
0 | 0 | \(9.7716\) | \(9.80665\) | Enter the exact target weight (\(9.80665\text{ g}\)) |
[-] |
0 | 0 | 0 | \(-0.03505\) | Subtract to find the raw weight difference (\(-0.03505\text{ g}\)) |
[f] [LASTX] |
0 | 0 | \(-0.03505\) | \(9.80665\) | Recall target weight from LASTX without re-typing it |
[÷] |
0 | 0 | 0 | \(-0.003574\) | Divide difference by target weight |
[g] [|x|] |
0 | 0 | 0 | \(0.003574\) | Take absolute value so error is positive |
100 [×] |
0 | 0 | 0 | \(0.357\) | Multiply by 100: 0.357% error (within \(0.36\%\)!) |
(Your print is within \(0.36\%\) of the target—and [f] [LASTX] saved you from re-typing 9.80665.)
9.4.2 3D Printing Snap-Fit Clearance Gap
When 3D printing interlocking parts—like the stacking lips of your Counting Tiles, the dovetail slots of the L-Frame Factoring Stage, or the \(42\text{ mm}\) Gridfinity Studio Bins—melted plastic expands slightly as it cools, so engineers leave a small clearance gap of \(0.15\text{ mm}\) on each side.
If a round peg is \(10.00\text{ mm}\) wide, what is the minimum hole width needed so the peg slides in smoothly? $\(\text{Hole Width} = \text{Peg Width} + (2 \times \text{Clearance Gap}) = 10.00\text{ mm} + (2 \times 0.15\text{ mm}) = 10.30\text{ mm}\)$
Doubling the \(0.15\text{ mm}\) side clearance and adding it to the \(10.00\text{ mm}\) peg width on the stack via 10 [ENTER] .15 [ENTER] 2 [×] [+] gives a smooth-sliding hole diameter of \(\mathbf{10.30\text{ mm}}\).
9.4.3 Archimedes' Mystery Filament Detective Test
Over two thousand years ago in Syracuse, King Hiero II suspected his goldsmith had secretly mixed cheaper, lighter silver into a solid gold crown—and asked Archimedes to unmask the fraud without scratching the crown! Archimedes realized that every pure material has its own unchangeable density fingerprint (\(\text{Density} = \text{Weight in Grams} \div \text{Volume in cm}^3\)).
You can run that exact Archimedes detective test on two unlabeled spools of black 3D-printing plastic on the back shelf of the maker lab: one is corn-based PLA (\(1.24\text{ g/cm}^3\), which prints cleanly at \(215^\circ\text{C}\)), and the other is petroleum-based ABS (\(1.04\text{ g/cm}^3\), which clogs a \(215^\circ\text{C}\) PLA nozzle!). Print a solid \(2.0\text{ cm} \times 2.0\text{ cm} \times 2.0\text{ cm}\) test cube from the mystery spool—the exact same \(2.0\text{ cm}\) calibration cube size we measured earlier in this chapter (2 [ENTER] 2 [×] 2 [×] \(\to\) 8 \(\text{cm}^3\) on Shelf \(X\)).
When you set that mystery cube on your digital scale, ABS would weigh only \(8.32\text{ grams}\), whereas the readout settles at \(9.92\text{ grams}\)! Typing 9.92 onto Shelf \(X\) (lifting 8.0 to Shelf \(Y\)), tapping [x⇄y] to put grams over cubic centimeters, and pressing [÷] lands on 1.24 (\(\mathbf{1.24\text{ g/cm}^3}\))—unmasking the mystery spool as genuine PLA (and for a curved 3D print like a chess knight that pushes up \(15.0\text{ cm}^3\) of water in a beaker and weighs \(18.60\text{ g}\), dividing 18.60 [ENTER] 15 [÷] reveals the exact same 1.24 PLA fingerprint!).
9.4.4 Workshop Safety Rules & Checking the Wall Outlet
Operating maker space equipment requires following classroom safety rules:
Workshop Safety & Electrical Power Rules 1. Heat Safety: 3D printer nozzles reach \(210^\circ\text{C} - 245^\circ\text{C}\); heated build plates reach \(60^\circ\text{C}\). Never touch the nozzle or heated bed while printing. 2. Battery Safety: Never short-circuit rechargeable batteries or drain them past their \(20\%\) reserve margin. 3. Eye Protection: Always wear safety glasses when launching tabletop catapults, testing water syringes, or clipping plastic support material. 4. Fresh Air: Always run the classroom air filter when 3D printing.
Have you ever plugged a toaster and a hair dryer into the same wall outlet and heard the circuit breaker click off in the hallway panel? Inside your classroom walls, copper wires warm up as electrical current (Amps) flows through them, and the National Electrical Code requires continuous loads to stay below \(80\%\) of a circuit breaker's rating (\(15\text{ Amps} \times 0.80 = 12.0\text{ Amps}\)).
Plugged into a single \(120\text{-Volt}\), \(15\text{-Amp}\) classroom wall circuit are four 3D printers (\(150\text{ W}\) each), two laptop computers (\(65\text{ W}\) each), and an air filter (\(80\text{ W}\)). On the stack, multiplying the 4 printers (4 [ENTER] 150 [×] \(\to 600\text{ W}\)), adding the 2 laptops (2 [ENTER] 65 [×] [+] \(\to 730\text{ W}\)), and adding the air filter (80 [+]) reveals a combined load of \(\mathbf{810\text{ Watts}}\). Dividing by the \(120\text{-Volt}\) wall voltage (120 [÷]) shows that the equipment draws \(\mathbf{6.75\text{ Amps}}\) of current. When you compute the \(80\%\) safe breaker limit (15 [ENTER] 80 [%] \(\to \mathbf{12.00\text{ Amps}}\)) and swap-subtract (12 [ENTER] 6.75 [-]), Shelf \(X\) confirms \(\mathbf{5.25\text{ Amps}}\) of safety margin to spare:
| Keystroke | Register T | Register Z | Register Y | Register X | What Happens on the Stack |
|---|---|---|---|---|---|
4 [ENTER] 150 [×] |
0 | 0 | 0 | 600 | Four 3D printers at \(150\text{ W}\) each \(= 600\text{ W}\) |
2 [ENTER] 65 [×] |
0 | 0 | 600 | 130 | Two laptops at \(65\text{ W}\) each \(= 130\text{ W}\); \(600\text{ W}\) waits on Shelf \(Y\) |
[+] |
0 | 0 | 0 | 730 | Combine printers and laptops (\(600 + 130 = 730\text{ W}\)) |
80 [+] |
0 | 0 | 0 | 810 | Add the \(80\text{ W}\) air filter: \(810\text{ Watts}\) total load |
120 [÷] |
0 | 0 | 0 | \(6.75\) | Divide by \(120\text{ Volts}\) to find current: 6.75 Amps |
15 [ENTER] .80 [×] |
0 | 0 | \(6.75\) | \(12.0\) | Compute \(80\%\) safe limit of \(15\text{ A}\) breaker: 12.0 Amps |
[x⇄y] [-] |
0 | 0 | 0 | \(5.25\) | Swap and subtract (\(12.0 - 6.75\)): 5.25 Amps of safety margin |
9.4.5 The Wright Brothers' 1901 Bicycle-Shop Wind Tunnel
At the turn of the twentieth century, some of the best-funded laboratories in the world were racing to build the first airplane—and failing. Why did two brothers from Dayton, Ohio, who never attended college and funded their experiments entirely with their own savings, succeed where famous institutions crashed? Because Wilbur Wright (1867–1912) and Orville Wright (1871–1948) were hands-on makers who trusted careful workshop measurements and notebook math over guesswork.
Long before they ever stood on the windy sand dunes of Kitty Hawk, North Carolina, Wilbur and Orville ran a home-built printing press and a neighborhood bicycle shop called The Wright Cycle Exchange at 1127 West Third Street in Dayton. In their back workshop, they brazed lightweight steel frames, trued wire-spoked wheels, and calculated sprocket-and-chain gear ratios (\(\text{Driven Teeth} \div \text{Driver Teeth}\)) for their own custom bicycle brands, the Van Cleve and the St. Clair. Bicycles taught the brothers three lessons that no textbook of the 1890s understood: how to build strong, feather-light structures out of triangles and tensioned spokes, how to transmit power efficiently through roller chains and sprockets, and why an unstable vehicle (like a bicycle or an airplane) stays upright not by being rigid and heavy, but by actively banking and steering into every turn.
In the summer of 1901, however, the brothers hit a heartbreaking wall. When they flew their full-size 1901 glider in the coastal winds at Kitty Hawk, its curved wings produced only one-third as much upward lift as the official air-pressure tables published by Europe's leading aeronautical scientists promised. Discouraged on the train ride home to Ohio, Wilbur remarked that humanity might not fly for a thousand years.
Back in their Dayton bicycle shop that autumn, the brothers decided to test whether the textbook equations themselves were wrong. First, they mounted a small model wing and a flat metal plate horizontally onto the front handlebars of a St. Clair bicycle and pedaled furiously down a Dayton street to watch how the wind pushed the two surfaces balanced against each other. Then, in October 1901, they cleared a space in the upstairs room above their bike shop and built a 6-foot-long wooden wind tunnel out of an old starch box with a glass viewing window on top, blown by a two-bladed fan connected to their shop's overhead belt drive.
Inside that homemade wooden tunnel, Orville and Wilbur placed two of the cleverest measuring instruments in engineering history: miniature aerodynamic balances hacked together out of old hacksaw blades and ground-down bicycle spokes! Just like the angle pointer and shadow scale on your Unit Circle Volvelle, the brothers' bicycle-spoke balance measured the exact angle of each miniature wing slice against the wind and let them read the lift and drag ratios directly off a protractor dial. Over two intense months in late 1901, Wilbur and Orville bent and filed more than 200 miniature wing shapes out of sheet steel, tested every angle of attack, and filled their pocket notebooks with the first accurate flight tables in human history.
Two years later—on December 17, 1903—those back-room wind-tunnel numbers took to the sky. Even on the 1903 Wright Flyer itself, their bicycle-shop DNA was everywhere: to turn the twin wooden propellers in opposite directions from their 12-horsepower engine, Wilbur and Orville linked the engine shaft to the propellers using heavy-duty bicycle sprockets and roller chains running through steel tubes (with a \(23\text{:}8\) sprocket reduction ratio—\(23 \div 8 = 2.875\text{ engine turns}\) for every \(1\text{ propeller turn}\)—to trade high motor speed for low-speed pushing thrust, just like the compound gear trains you built in this chapter!). Every time you measure a filament strand with calipers, time 10 swings of a pendulum, log catapult trials with [Σ+] and [g] [MAD], or test a gear ratio on your SC-6, you are working in the exact spirit of the two bicycle mechanics from Dayton who measured their way into the sky.
9.4.6 Why Triangles Hold Up Bridges: Testing Paper Trusses to Failure
One of the first things Wilbur and Orville Wright noticed in their bicycle shop is that a four-sided rectangle pinned at its corners is floppy—push on one corner and it collapses into a tilted parallelogram—whereas a three-sided triangle cannot change its shape without bending or breaking one of its sides! That geometric rule is why bicycle frames, bridge trusses, roof rafters, and the internal honeycomb infill inside your 3D-printed math blocks are all built out of triangles.
When civil and aerospace engineers design a bridge or an airplane wing, they don't just ask "How much weight can it hold?" Anyone can build a bridge out of solid cast iron that holds a heavy load if you don't care how heavy the bridge itself is! Instead, real engineers measure a structure's Strength-to-Weight Ratio—dividing the maximum load the bridge holds before buckling by the weight of the bridge itself:
You can run a real structural engineering lab right at your desk using two hardcover books spaced \(16\text{ centimeters}\) apart, two identical sheets of notebook or printer paper (each weighing about \(4.5\text{ grams}\)), and a cup of U.S. pennies (where each copper-plated zinc penny weighs exactly \(2.50\text{ grams}\) on a digital scale!):
| Bridge Design Across a \(16\text{ cm}\) Gap | Bridge Mass (\(M\)) | Pennies Held (\(N\)) | Total Load (\(2.50\text{ g} \times N\)) | Strength-to-Weight Ratio (\(\text{Load} \div M\)) |
|---|---|---|---|---|
| 1. Flat Unfolded Sheet of Paper | \(4.5\text{ g}\) | \(2\) pennies | \(5.0\text{ g}\) | 5 [ENTER] 4.5 [÷] \(\to\) 1.11× its weight |
2. Folded Side-Wall Channel (U-Beam) |
\(4.5\text{ g}\) | \(28\) pennies | \(70.0\text{ g}\) | 28 [ENTER] 2.5 [×] 4.5 [÷] \(\to\) 15.56× its weight |
| 3. Accordion Triangle Truss (7 Pleats) | \(4.5\text{ g}\) | \(108\) pennies | \(270.0\text{ g}\) | 108 [ENTER] 2.5 [×] 4.5 [÷] \(\to\) 60.00× its weight! |
Verify the Accordion Triangle Truss on your SC-6 stack: multiplying 108 pennies by \(2.50\text{ g}\) per penny (108 [ENTER] 2.5 [×] \(\to \mathbf{270.0\text{ g}}\)) and dividing by the \(4.5\text{ g}\) sheet of paper (4.5 [÷] \(\to \mathbf{60.00}\)) shows that folding triangular pleats lets that \(4.5\text{-gram}\) sheet hold 60 times its own weight (60 [ENTER] 1.1111 [÷] \(\to \mathbf{54\times}\) stronger than the flat sheet!). That is why your 3D-printer slicer fills the inside of your Fraction Towers and Gridfinity Trays with triangular and honeycomb infill rather than solid plastic—printing in a third of the time while shrugging off classroom drops.
9.4.7 Three Weekend Maker-Bench Experiments to Try
- The Kitchen-Table Pendulum Timing Lab: Tie a washer to a \(100\text{ cm}\) string, time 10 swings with a stopwatch, and divide by \(10\) on your SC-6 (\(\sim 2.0\text{ s}\) per swing). Then shorten the string to \(25\text{ cm}\) (one-fourth as long) and time 10 swings to see why a quarter-length pendulum swings twice as fast!
- The Baker's Percentage Pizza Night: Weigh \(400\text{ g}\) of flour on a kitchen scale (\(100\%\)) and use
[%]on your SC-6 to find the gram weights for \(65\%\) warm water (400 [ENTER] 65 [%]\(\to 260\text{ g}\)), \(2\%\) salt (2 [%]\(\to 8\text{ g}\)), and \(1.5\%\) yeast (1.5 [%]\(\to 6\text{ g}\))! - The 3D-Printer Slicer &
[f] [LASTX]Height Sprint: Measure a block's height in centimeters, subtract a \(2\text{ cm}\) base, and divide by.02(\(0.02\text{ cm}\) per layer) to find the layer count—then tap[f] [LASTX] [×]to prove those layers stack right back to the exact height!
9.4.8 Thinking Like an Engineer at the Workbench
Across these nine chapters, you have seen how every workshop invention—from a 3D-printed Counting Tile tray to a two-stage robot winch—is built out of intermediate steps that sit in plain sight on your four-shelf stack (\(X, Y, Z, T\)) just like physical blocks on a desk:
| Maker Project | What You Measure on the Bench | Stack Keys That Power Your Build |
|---|---|---|
| 1–2. 3D-Print Spool & Layer Slicer | Spool length (\(1,200\text{ cm}\)), PLA density (\(1.24\text{ g/cm}^3\)), \(0.02\text{ cm}\) layers | [x²], [π], [×], [÷], and [f] [LASTX] reverse height verification |
| 3–4. Clock Pendulum & Solar Oven | \(100\text{ cm}\) vs. \(25\text{ cm}\) pendulum string (\(2\times\) speed) & \(22.5^\circ\text{C} \to 78.0^\circ\text{C}\) solar oven | [÷], [f] [√x], and [+]/[-] temperature-rise tracking |
| 5–6. Tabletop Catapult & Bean Sprouts | 3-launch landing distances (\(156\text{ cm}\) & \(191\text{ cm}\) means) & 6-day bean growth (\(12.83\text{ mm/day}\)) | [g] [CLΣ], [Σ+], [g] [x̄], [f] [MED], and [g] [MAD] consistency |
| 7–8. Baker's Dough & Compound Gears | \(65\%\) baker's hydration (\(3,510\text{ g}\) water) & \(40{:}10 \times 30{:}15\) gear winches (\(8\times\)) | Non-consuming [%], fraction scaling ([a ᵇ/c]), and multi-shelf [÷] [×] |
| 9–10. Hydraulic Lifter & Drone Battery | \(1\text{ cm}\) vs. \(3\text{ cm}\) syringes (\(9\times\) force) & \(1,200\text{ mAh}\) \(80\%\) safe flight timer | [x²] area multiplier (45.0 N lift), 0.8 [×], and 60 [×] (\(11.52\text{ min}\)) |
| 11–12. Solar Panel Tilt & Density Check | \(30^\circ\text{–}60^\circ\) sun-tilt factors (\(5.00\text{ W}\) panel), \(0.357\%\) scale check & PLA density (\(1.24\text{ g/cm}^3\)) | [×], [g] [|x|] percent-error check, and [÷] water displacement |
Remember the Wright brothers' secret from their Dayton bicycle shop: real discovery happens when your hands build the model, your eyes measure what happens, and your stack turns every measurement into clear understanding. To 3D print your own blocks or see how the SC-6 was engineered, turn to Appendix A, explore classroom stations in Appendix B, look up geometry, fraction, and unit references in Appendix C, or tour every button in Appendix D. Keep building, keep measuring, and keep exploring!